Showing posts with label homemade gifts. Show all posts

Sunday, November 26, 2017

December in Our Homeschool

For the last few years, each December we've had a special month in our homeschool. I let a few things drop off my homeschool mental to-do list (such as science and history exposure), and instead we shift our focus to holiday-related activities. This makes December a month to celebrate the flexibility of homeschooling while we dig into more artistic and musical pursuits.

December Curriculum Focus

Our curriculum focus for December includes the following. I don't require my children to participate in these activities, but nonetheless they generally both choose to participate in all of these to varying degrees.

  • Family music recital
  • Advent crafts
  • Homemade Christmas presents
  • Family reading of A Christmas Carol script
  • Winter and Christmas-themed read-alouds
  • Winter and Christmas movies


Family Music Recital

The children and I choose a few Christmas songs to play together. Throughout the month, we practice individually and together, as much as we each desire to. On Christmas Eve, we perform the songs together. The instruments we have on-hand for our Christmas songs are:
(If there is interest, I can post more details about how and what we do for our December music together.)

Advent Crafts

As a fun way to count down the days until Christmas, my children enjoy doing Advent crafts, which have one activity for each day from December 1st through 24th.  My kids have especially enjoyed doing the Advent Colouring Pages from Activity Village, such as the Christmas train and village, which can be cut out and made into a scene.

The Activity Village Advent resources used to be free, but are no longer.  Some other free options I have found include the following:
Commonly, my kids are really excited about Advent crafts for the first couple weeks of December, and then their interest fizzles out. This is totally okay, and I just let them participate as much (or as little) as they want to.


Homemade Christmas Presents

In the week leading up to Christmas, my children and I get to work on making homemade Christmas presents for family and friends.  The presents we've made have included Christmas tree ornaments, cardboard and/or popsicle stick toys, artwork, and food treats. This is an inexpensive and sweet way to shift the focus of Christmas away from ourselves and onto what we can make for others.


Family Reading of A Christmas Carol Script
Charles Dickens' A Christmas Carol is a wonderful little story about the real meaning of Christmas. My family has enjoyed doing a reading of A Christmas Carol script for the last few years. Sometimes, this has been as simple as us all reading it together on Christmas Eve; other times, it has turned into more of a project for myself and the kids in putting on a little play with figurines, costumes, and sound effects. In the weeks before Christmas, the kids and I do a few practice read-throughs of our parts so that we are ready for the Christmas Eve reading. 

Winter and Christmas-Themed Read-Alouds
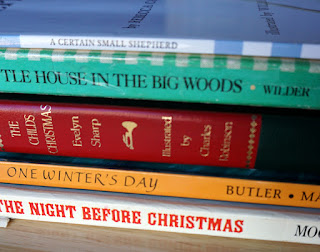
Throughout the month of December, I read-aloud books which have an emphasis on winter and Christmas. These include the following:

Christmas Movies for Family Movie Night

For our weekly Family Movie Nights in December, we watch winter and Christmas movies. Some of our favorites include the following:

A Great Way to End the Year

By shifting the focus in our homeschool for December, we are able to thoroughly enjoy the last month of the year together.  Instead of feeling like we are dragging our feet or going through the motions, December has become a cherished month of homeschooling for our family.  

Do you have any December homeschool traditions to share?


Affiliate Disclosure - Links to Amazon are affiliate links. If you use these links, your price remains the same, but I earn a small commission. Thanks for supporting this site!

Friday, April 3, 2015

New Traditions : How We Celebrate Birthdays

Back when we had only one child, we had the typical yearly birthday parties with lots of presents, food, and friends.  While this was enjoyable in some ways, once we had a second child I felt like the work that went into birthday parties was overly stressful.  Since our two children have birthdays just one month apart beginning shortly after the winter holidays (in February and March), followed shortly by my husband's birthday in April, the birthday festivities just felt like too much -  too many presents following so closely behind Christmas, too many festivities in too short of a period, and too many times that I felt burned out by it all. 

Rather than continue the cycle, a few years ago we decided to do something different. Instead of  having birthday parties for the children year-after-year, we decided to create our own birthday traditions. And now that we are three years into our new family birthday traditions, we are loving the simplicity and family closeness that they bring.

Birthday Family Trips

For their birthdays, each of our children selects a fun activity for our family-of-four that doesn't require driving very far. These birthday family trips give us a chance to spend time together in different ways, and they eliminate the stress of hosting birthday parties. Both of our children have thoroughly embraced the opportunity to choose these family outings. We schedule birthday family trips on weekend days so we can all participate. 

Examples of some of our recent birthday family trips are: 
  • For her 7th birthday, our daughter chose to visit Rockhound State Park (just over an hour away).
  • For her recent 8th birthday, our daughter chose the local Farm and Ranch Museum.
  • For his 4th birthday, our son chose to go to the zoo and ride the toy train in Alamogordo, New Mexico (about an hour away).
  • For his recent 5th birthday, our son chose to go to the Space Museum and ride the toy train in Alamogordo.
We have intentionally kept these family outings simple. We do not invite anyone outside of our household, and that allows our trips to be relaxed so that we can leave whenever we are ready instead of trying to keep to a specific time-schedule. We also typically enjoy a restaurant lunch as part of each birthday trip, so there is no stress over preparing or transporting food.

Minimal Presents

My husband and I do not buy the children gifts for their birthdays; instead, our family outing becomes their present. We do look for small, unique toys for the children during our family outings, such as the few colored rocks and marbles that caught their eyes at the Farm and Ranch Museum during our daughter's birthday trip. But we have intentionally shifted the focus of birthdays away from presents and onto creating family memories.

Of course, we don't deny the grandparents their rights to give the children birthday presents, but by eliminating the birthday parties we have much-reduced the volume of toys flowing into the house. Given the close proximity of their birthdays to Christmas, and the fact that our children tend to be happier with less toys (and have more strife when they have more toys), having less birthday presents is a very good thing.

Simple, Special Birthdays

In addition to the family outings on the weekend, on my children's actual birthdays I do some simple things to make the day special:
  • I schedule a day-off from my usual homeopathic appointments so that I can spend more time with the children. 
  • The birthday-child chooses their favorite school activities and games to play in the mornings during our usual school time. (Since we switched to Leadership Education, my kids LOVE school, so they are excited about this aspect of their birthdays.)
  • The birthday-child gets a day off from the usual daily chores (such as washing breakfast dishes, putting away laundry, taking care of chickens, etc).
  • The children and I go on a small outing together, chosen by the birthday-child, such as a trip to the park or museum. 
  • The birthday-child's favorite dinner is served that evening, as well as a dessert of their choice (with birthday candles of course). Grandma is invited to join us for the evening as well.
By breaking away from the traditional birthday parties, our family's new traditions allow us to spend time together, make fond memories, and enjoy each birthday.

Do you have any special birthday traditions?  

Sunday, November 30, 2014

Holiday Gift Ideas

As the holidays approach, I thought I'd share some my favorite gift ideas. Please share your own favorite gift ideas in the comments section.

Toys That Fuel Imagination and Active Play

  • Play Silks: Super soft, lightweight, and beautiful. My kids love using their playsilks as capes, blankets for stuffed animals, parachutes, ropes, and much more.
  • Active Play: The Mini Micro Scooter is absolutely fantastic; it has 3 wheels (so it can be used by children as young as 3 years old) and uses the natural tendency of leaning to turn. When my children were younger, they learned how to balance on a bike by using the Kazam Balance Bike. It has no pedals; rather the child is able to walk and eventually run while learning to balance. 
  • Marble Run: My children have gotten much use out of their Marble Run. They love to rearrange the parts to create new ways for the marbles to reach the bottom.
  • Pelikan Watercolor Paints: These paints have gotten our whole family painting.  They are not washable, but they are really vibrant compared to the Crayola watercolors we've used in the past.

Skin and Body Care

  • Homemade Hard Lotion and Lip Balm: Hard lotion bars are made from coconut oil, shea butter, and beeswax. These are a favorite for many of my friends and family.  Hard lotion works wonderfully as an all-purpose moisturizer as well as for extra-dry spots such as winter-time feet. It can even be used as a hairstyling product!
  • Homemade Whipped Body Butter: Body butter is an all-purpose moisturizer that is lighter than hard lotion and applies very smoothly and easily.  One good way I have found to store it is in a deodorant-type container; that allows for it to be easily smeared on legs, arms, or anywhere else. Whipped body butter would also make a great belly moisturizer for any expectant mothers. 
  • Coconut and Papaya Bar Soap: This luxurious soap has a wonderful, light scent, a smooth, foamy lather, and it doesn't dry out the skin.   
  • Herbal Healing Salve: This salve combines healing herbs such as calendula with coconut oil, beeswax, and essential oils. Healing salve works great for cuts, scrapes, bites, bruises and more. A good salve is an essential item for parents and homesteaders.

Natural Candles

  • Homemade Tallow Container Candles: Tallow candles are made using rendered beef tallow as candle wax. Tallow was traditionally used to make candles hundreds of years ago, and makes for pretty white candles.
  • Homemade Beeswax and Coconut Oil Candles: These candles impart a light, sweet smell to the air. This tutorial shows how to make them. (I used unrefined coconut oil instead of palm oil).

Nature-Inspired Gifts

  • Sock Bird Feeders: Our sock bird feeders bring us so much joy and wonder. They attract the cutest little birds.  We love to hang ours close by kitchen windows where we can watch the birds as we share meals or wash dishes.
  • Wooden Ornaments: My blogger friend Taryn and her husband Jeff make a wide assortment of wool and wooden objects, including beautiful Christmas ornaments.  I am astounded by the beauty that Jeff can create in these handmade ornaments.  
  • Celestron 44202 Microscope: A microscope is a fantastic way to see so much of the detail that goes into every natural object. We love using our Celestron microscope to take a closer look at insects, plants, rocks, and anything else we think of.  
  • Live Butterfly Garden: A live butterfly garden can bring such delight and wonder to children (and adults too).  This is a kit that comes with everything needed to raise caterpillars into butterflies. We re-use ours every year when we find caterpillars in our yard, whom we supply with ample food while we watch them grow and metamorphosize, eventually releasing them back out into our yard.

Do you make any homemade gifts? Which are your favorites?

Links to Amazon are affiliate links. If you use these links, your price remains the same, but I earn a small commission. Thanks for supporting this site!

Tuesday, November 18, 2014

Pumpkin & Chocolate Chip Muffins (nutrient-dense)

A friend recently offered me a pumpkin muffin and I was surprised to find chocolate chips inside. I'd never had pumpkin with chocolate before, and I was enamored of this new flavor combination.  I was inspired to make my own version of Pumpkin & Chocolate Chip Muffins; these muffins are super tasty and will now be a regular part of our Fall breakfasts.

Pumpkin & Chocolate Chip Muffins
  1. Line a muffin tin with paper cups.  (I prefer If You Care Unbleached Baking Cups because the muffins do not stick to the sides of the cups.)
  2. Combine the einkorn, coconut flour, ground nuts, salt, baking powder, baking soda, nutmeg, cinnamon, ginger, and cloves in a medium bowl. Whisk it all together to break up any lumps.  
  3. Preheat the oven to 350 degrees F.
  4. Combine the butter and sucanat in a large bowl (a Kitchen-Aid stand mixer works great for this recipe). Cream together for a couple minutes until the mixture turns slightly lighter in color.
  5. Mix in the molasses until well-combined. 
  6. Combine the eggs, vanilla, and almond extract in a small bowl. (I find that a Pyrex glass measuring cup works great for this because the pour spout makes it easy to add these ingredients to the mixer while it is running.) Do NOT mix up the eggs at this point.
  7. Mix the eggs one-at-a-time into the butter/sucanat mixture.  With my stand-mixer, I can just pour in each egg while the mixer is still running.  Make sure to scrape down the sides of the bowl once or twice to get everything incorporated well. (It is okay if the mixture looks a bit curdled during this step.)
  8. Mix in the pumpkin puree.
  9. Add the dry ingredients a bit at a time.  Because the Einkorn flour does contain gluten, make sure not to overmix or the muffins will be tough. 
  10. Stir or mix in the chocolate chips.
  11. Use a 3-Tb scoop or large spoon to scoop the batter into the muffin cups.
  12. Bake the muffins at 350 degrees F for 27-32 minutes, until a toothpick inserted into the middle of a muffin comes out dry.
  13. Remove from the oven and allow to cool a bit before serving.
 Links to Amazon are affiliate links. If you use these links, your price remains the same, but I earn a small commission. Thanks for supporting this site!

Wednesday, June 18, 2014

Superfood Soda Concentrate (nutrient-dense : raw)

Refreshing, tart, and sweet: my family has been enjoying this simple drink concentrate for over a year. It combines two traditional superfoods, raw honey and raw apple cider vinegar, which combine to make an uber-healthy, wonderfully tasty drink.

I have hesitated to share this recipe, because it is so simple and easy to make.  But after having multiple friends ask me for the recipe, I figured my blog followers would like to know it, too.

Superfood Soda Concentrate

  1. If your raw honey has become thick and crystallized, warm it up by placing the jar in a bowl of warm water. This will allow the honey to become thin and pourable. 
  2. Combine equal parts of raw honey and apple cider vinegar. My favorite way to do this involves no measuring and minimal cleanup: Use a half-full jar of raw apple cider vinegar. Place a funnel into the jar, and pour in the honey through the funnel.  It may take a couple refills of the funnel depending on the size of your vinegar jar and funnel. Be patient, as the thick honey can take quite awhile to drip through the funnel; I like to find something else to do in the meantime.
  3. Put a tight-fitting lid on the jar.  Over the next day or two, periodically invert the jar and swish the contents around. It can take awhile for the honey to fully dissolve into the vinegar. 
  4. Once the honey has been fully dissolved in the vinegar, the soda concentrate is ready!
  5. To make a drink, simply pour some of the concentrate into a glass, add your favorite sparkling mineral water, and stir.  The amount of concentrate to use will vary depending on your preference. I like to use roughly 3-4 Tb of concentrate per one cup of fizzy water.
  6. If you don't like fizzy drinks, this same concentrate can be combined with plain, filtered water for a nice electrolyte drink.  When using plain water, I use less of the concentrate, about 1-2 Tb per cup of water.

What is your favorite summertime drink?

 Links to Amazon are affiliate links. If you use these links, your price remains the same, but I earn a small commission. Thanks for supporting this site!

Friday, November 29, 2013

Holiday Gift Ideas for 2013

As the holidays near, I thought I would share a list of some of my favorite gift ideas for 2013. Many of these are homemade and frugal. Please share your own favorite gift ideas in the comments section.

Skin Care


  • Homemade hard lotion bars are a favorite for many of my friends and family.  Hard lotion works wonderfully as an all-purpose moisturizer as well as for extra-dry spots such as winter-time feet. A few of my friends even use a dab of hard lotion to style their hair.
  • Homemade whipped body butter is an all-purpose moisturizer that is lighter than hard lotion and applies very smoothly and easily.  One good way I have found to store it is in a deodorant-type container; that allows for it to be easily smeared on legs, arms, or anywhere else. Whipped body butter would also make a great belly moisturizer for any expectant mothers. 
  • Naturally tinted balm for lips or cheeks is a wonderful girlie gift.  Although I've never been much of a lip-color-wearer, I like to use this colored balm on my lips for special occasions.  My daughter has never been allowed to wear any makeup (she is only 6 & 1/2 after all), but when I received this colored balm it was great that she could try it out too because the ingredients were so natural and safe. In typical 6-year-old fashion, my daughter used the balm on her lips, cheeks, and eye lids too.  The color looks very natural, so even on a 6-year-old it didn't look gaudy (although obviously she is too young to wear makeup on a daily basis). 

Homemade Candles

  • Homemade tallow container candles are made using rendered beef tallow as candle wax. Tallow was traditionally used to make candles hundreds of years ago, and makes for pretty white candles.
  • Homemade beeswax and coconut oil candles impart a light, sweet smell to the air. This tutorial shows how to make them (I used unrefined coconut oil instead of palm oil).
  • Pure beeswax candles clean the air, burn slowly, and smell wonderful.  You can make your own using this tutorial.

Nature-Inspired Gifts

  • Sock bird feeders attract the cutest little birds.  I love to hang one in a spot where I can watch the birds from my living room. 
  • Flower seeds can make a great gift for any young child.  We like to collect seeds from our own flowers and package them up to give as gifts. 
  • A field guide for the local area makes a wonderful gift for any nature enthusiast or child.  We love to use our National Audubon Society Field Guide for the Southwestern States whenever we find a new creature in our yard or for exploring in the desert.

Real Foodie Gifts

All of these recipes store well, which makes them great for gift-giving. They are all grain-free.

Grandparent Gifts

  • Photo albums featuring the grandchildren are always welcomed by grandparents.
  • Handprint or footprint ornaments are gifts that can last a lifetime. Paint some silver paint onto your child's hand or foot, then place onto a large glass ball ornament; allow to dry and then write the year and child's name with a silver Sharpie
  • Letters, stories, or pictures made by the kids are also among our favorite grandparent gifts. If they are too young to write themselves, type up a story dictated by your child and print it on nice paper; I like to leave a space on each page for my daughter to draw a picture to accompany the text.

What are your favorite homemade gifts?

Tuesday, March 26, 2013

How to Make Flavored Kombucha Tea

We've been brewing our own kombucha tea for several years now.  We brew multiple gallons of kombucha at a time, and over the last year or so we've experimented quite a bit with making different flavors. Making flavored kombucha tea is really quite simple to do, but there are some subtle differences to making each flavor the best it can be.

Start with Some Finished Kombucha

To make flavored kombucha, you need to start with some plain kombucha. You can see my recipe for making kombucha tea here. We pour the finished kombucha into 2-cup jars and flavor each jar individually. We like to save bottles from the GT's kombucha sold in stores for this purpose, and we also use mason jars.  If you want your kombucha to be extra fizzy, Fido jars work well.  I wouldn't recommend using bottles with very small openings with this method, as it will be particularly difficult to clean them out and make sure that all the flavoring bits are removed.

Our Favorite Flavors

These are the flavors we keep making time and time again. With all of these flavors, a short fermenting time on the counter helps develop the flavors and create a bit of fizz.  The ideal fermenting time varies a bit with each flavor, so read below for specific details.  All of the amounts listed below correspond to a 2-cup (16-ounce) jar of plain kombucha.
  • Raspberry - Raspberry kombucha is slightly sweet and delicious.  This is a great flavor to use for people who haven't learned to love the tanginess of kombucha quite yet.
    • I find that frozen raspberries have the best flavor and the least chance of any mold contamination. The berries you use must be absolutely mold-free, else the kombucha will be nasty.
    • Add ~6 raspberries to each jar. 
    • Leave the jar to ferment on the counter for 2 days and then transfer to the refrigerator.
    • When pouring the raspberry kombucha from each jar, a fork can be used to keep the berries from falling into each drink.  Our backyard chickens absolutely love to eat these kombucha-flavored berries, but they would also be a great addition to the compost heap.

  • Fresh Ginger - Fresh ginger added to kombucha makes an amazingly refreshing drink.
    • Use either a garlic press or a juicer to prepare the ginger. I do not recommend chopping/mincing the ginger for use in kombucha because it is rather fibrous.  Using a garlic press or juicer will remove most of the fibrous material, and the kombucha is much better without it. I slice the ginger into roughly 1/4-inch pieces before pressing it in my garlic press. 
    • Add the pressed/juiced ginger to each jar of kombucha.  Even a small amount (< 1/8 tsp) of ginger per jar is delicious, but for the best flavor I like to use a larger amount (~1/4 tsp).
    • Leave the jar to ferment on the counter for 1-2 days and then transfer to the refrigerator.
    • We drink this kombucha and the ginger bits without straining it.
  • Lemon - Lemon kombucha is superb!  Such a simple, fresh flavor.
    • Use a reamer to juice some lemons. Don't be tempted to just squeeze the lemons, as you will get MUCH more juice using a reamer. It is fine if there is pulp along with the juice, but be sure to remove any lemon seeds.
    • Add 1-3 tsp lemon juice per jar. Using 3 tsp will give you a nicely tart drink, whereas 1 tsp of lemon juice adds a more mild flavor.
    • Only allow lemon kombucha to sit on the counter for 12-15 hours. If it sits out longer, it will grow lots of little SCOBY bits that aren't desirable for drinking.
    • We drink lemon kombucha without straining out the pulp.
  • Lemon Ginger - Lemon and ginger combine to make a very tasty drink.
    • Prepare the ginger and lemon juice using the same methods described for the lemon and ginger kombuchas.
    • Add 1/4 tsp ginger and 2 tsp lemon juice to each jar.
    • Only allow ginger lemon kombucha to sit on the counter for 12-15 hours. If it sits out longer, it will grow lots of little SCOBY bits that aren't desirable for drinking.
  • Lemon Raspberry - Lemon raspberry kombucha is reminiscent of raspberry lemonade, but with a delicious tanginess.
    • Prepare the lemon juice using the same method described for the lemon kombucha.
    • Add 6 raspberries and 2 tsp lemon juice to each jar.
    • Only allow lemon raspberry kombucha to sit on the counter for 12-15 hours. If it sits out longer, it will grow lots of little SCOBY bits that aren't desirable for drinking.
  • Triple Tasty! Ginger, Lemon, and Raspberry - For an extra flavor punch, try combining all three flavorings.
    • Prepare the ginger and lemon juice using the same methods described for the lemon and ginger kombuchas.
    • Add 4 raspberries, 1/4 tsp ginger, and 2 tsp lemon juice to each jar.
    • Only allow triple kombucha to sit on the counter for 12-15 hours. If it sits out longer, it will grow lots of little SCOBY bits that aren't desirable for drinking.

Some Flavors We Haven't Enjoyed

There are a few flavors of kombucha we have tried that did not turn out so well: strawberry, orange, blueberry, and blackberry.  They are still drinkable, but nearly as tasty as our favorite flavors.

Do you brew your own kombucha?  Do you enjoy it plain, or flavored?  What is your favorite flavor?

This post is part of Fat Tuesday! 

Friday, December 7, 2012

Homemade Christmas Presents for 2012


Homemade presents are a wonderful way to celebrate the winter and Christmas holidays.  They are also a great way to be frugal. 

Gifts for Everyone
These ideas are sure to please.
 Gifts for Grandparents
Gifts for grandparents can be especially easy.

  • photo albums featuring the grandchildren
  • handprint or footprint ornaments - paint some silver paint onto your child's hand or foot, then place onto a large glass ball ornament; allow to dry and then write the year and child's name with a silver Sharpie
  • letters, stories, or pictures made by the kids - if they are too young to write themselves, type up a story dictated by your child and print it on nice paper; I like to leave a space on each page for my daughter to draw a picture to accompany the text
Gifts For the Real Foodie
All of these recipes store well, which makes them great for gift-giving. They are all grain-free.
What are your favorite homemade gifts?

Sunday, October 7, 2012

Homemade Vanilla Extract


Vanilla extract is very easy to make at home by simply combining alcohol with vanilla beans and letting it sit for awhile.  Homemade vanilla extract is much more cost effective than buying vanilla extract from the store, so it can save you quite a bit of money if you make many baked goods or desserts. Homemade vanilla extract also makes a great Christmas present!

Ensuring a Strong Flavor
The FDA standard for vanilla extract calls for 13.35 ounces of vanilla beans per gallon of alcohol.  That works out to 0.83 ounces of vanilla bean per cup of alcohol.  Some chefs use double or triple strength vanilla extract, which uses many more beans.

To make sure my vanilla extract has a strong enough flavor, I round up from the FDA standard and use a full one ounce of beans per cup of alcohol.  All vanilla beans are not exactly the same size (they are from a plant after all), but with the Bourbon vanilla beans I use, it works out to 6-8 vanilla beans per cup of alcohol.

Cost Comparison
When I buy vanilla extract, I usually buy organic since most others have added sugar. The organic vanilla extract is at least $10 for a 4-ounce bottle (that is $2.50/ounce). The price for my homemade vanilla extract is breaks down as:
  • 1.75 L vodka - $25 (I'm sure you could get this cheaper at one of the big-box stores)
  • 8 oz vanilla beans - $28 (roughly 50 beans, which is almost perfect for making 7 cups of extract)
  • Total: $53 for 56 ounces of extract, or $0.95/ounce
That's less than half the price of storebought vanilla extract!
Choice of Ingredients
Vanilla extract is traditionally made with vodka, and that is all I've ever used.  But some people prefer to use other alcohols, such as rum.  The FDA standard just calls for a minimum of 35% alcohol (which would be 70 proof).

There are also different types of vanilla beans.  So far, I've only used Bourbon vanilla beans, but there are also Tahitian beans (which I think are a little bit smaller than Bourbon beans). Feel free to experiment to see what flavor you prefer.

How Long Does it Take?
Once you combine the alcohol and vanilla beans, you need to let it sit for at least a few months before you start using it. Six months is even better. If you want to make some for the December holidays coming up, you'd better get started soon!

Recipe: Homemade Vanilla Extract
This recipe will make a LARGE amount of vanilla extract.  Why make a small amount when you could make a large amount and have enough to last a good long while?

Makes 7 cups of vanilla extract
  • 1.75 L vodka
  • half pound (8 ounces) of Bourbon vanilla beans
  • Two quart mason jars and one pint mason jar
  • A strainer and small brown bottles if you want to give some extract away once it is done
  1. Count out your beans.  You will need about 20-22 beans for each quart mason jar and 9-10 beans for the pint jar (depending on the size of the beans). If you are using some other type of vanilla beans besides Bourbon beans, you may want to weigh them to make sure you are using around an ounce of beans per cup of alcohol. 
  2. With a sharp paring knife, slice each bean in half lengthwise. Then use the flat side of the knife blade to scrape across each bean half. This will release the vanilla bean "caviar" onto the knife, as shown in the picture. To streamline this process, I find it works well to slice all the beans at once, then scrape the caviar out all at once.
  3. Put the vanilla "caviar" into the jar.  Then cut the scraped out seed pod in half or even in quarters so they will fit easily inside your jars and be fully submerged in the liquid.
  4. Once you have sliced and scraped all of the beans for each jar, simply pour in the appropriate amount of vodka.  For the quart jars, pour in 3 cups of vodka.  For the pint mason jar, pour in the remaining vodka (which is a little less than 1.5 cups).
  5. Put a tight lid on the jars and store them in a dark place.  Every so often, swirl the liquid around in the jars a bit.  I store my jars in a dark kitchen cabinet, and swish the liquid around whenever I get other items out of the cabinet.  If you don't want to store the jars in a dark place, make sure you use dark colored bottles, such as amber bottles.
  6. Let the bottles sit for at least 3 months; 6 months is even better!  Just remember to swirl the liquid around occasionally to get the most out of the vanilla beans.
  7. Once the beans/caviar have been steeping in the alcohol for about 3 months, you can start to use the vanilla extract. I like to leave the beans and caviar in the jar and just take the extract from the top. Or, you can strain some extract into small amber bottles and give it away as gifts.

Sunday, December 4, 2011

Homemade Christmas Presents

Homemade presents are a wonderful way to celebrate the winter and Christmas holidays.  They are also a great way to be frugal. 

Gifts for Everyone
These ideas are sure to please.

Gifts for Grandparents
Gifts for grandparents can be especially easy.
  • photo albums featuring the grandchildren
  • handprint or footprint ornaments
  • letters, stories, or pictures made by the kids

Gifts For the Real Foodie
All of these recipes store well, which makes them great for gift-giving. They are all grain-free.
What are your favorite homemade gifts?

This post is part of Fight Back Friday, Pennywise Platter, Frugal Days, Sustainable Ways, Fat Tuesday and Monday Mania!

    Thursday, December 1, 2011

    Tallow Container Candles

    Tallow, which is rendered beef fat, was traditionally used to make candles hundreds of years ago.  The last time I rendered some tallow, I found that making tallow candles is very easy! We've been enjoying the soothing light created by these tallow candles in the evenings.  And I have not noticed any beefy smell from these candles. They would also make a wonderful Christmas present!

    Tallow Container Candles
    Equipment and ingredients needed:
    • hot glue gun and glue sticks
    • small mason jars (or other glass containers of your choice)
    • cotton wick material
    • pure tallow
    • spoons and clothespins (for centering the wicks in the jars)
    1. Plug in your glue gun so it can start warming up.  I like to place it over a paper towel to catch any little drips.
    2. Cut wicks to the appropriate size for your containers.  Make sure you leave a bit extra to be glued onto the bottom of the jar, as well as for holding the wick in the center of the jars.  It worked well for me to make the wicks about 2 inches longer than the height of my jars.
    3. Use hot glue to glue the wicks to the middle of the bottom of the jars.
    4. Use a spoon and clothespin to stand the wick upright in the jar.  Try your best to get the wick right in the middle of the jar.OF course, if you pull too hard the glue wil detach from the bottom of the jar.
    5. Melt the tallow.  I actually just scooped it right off the top (once it had been strained) the last time I rendered tallow, which saved the step of melting it.
    6. Pour the tallow into the jars.  Let them sit for several hours or overnight to harden before you remove the spoons and clothespins.
    7. Allow the candles to fully harden before you light them.  This will take at least 12 hours. Beware that the tallow does not get super-hard like paraffin candles from the store (I'm sure this depends on just how cool your house is in the winter).
    8. Trim the wicks and light the candles. Enjoy the soothing atmosphere of candlelight! 
    This post is part of Frugal Days, Sustainable Ways, Fat Tuesday, Monday Mania, Fight Back Friday and Handmade Christmas Gift Carnival!