Showing posts with label fermented foods. Show all posts

Friday, May 19, 2017

Cobb Salad (grain-free : gluten-free : nutrient-dense)

As my children and I are wrapping up our unit study on the United States, we're "visiting" the west coast.  Cobb Salad is a California specialty that has become a mainstay salad all over the country.

An easy way to remember the ingredients in Cobb Salad is to use the acronym EAT COBB - Egg, Avocado, Tomato, Chicken, Onion, Bacon, Bleu cheese. My family enjoyed this hearty salad recipe, although it was preferred to substitute goat cheese for the bleu cheese.

Cobb Salad
Serves 4
  • For the chicken:
    • 3 skin-on, bone-in chicken thighs
    • 1 carrot, peeled and chopped roughly
    • 1 celery stalk, chopped roughly
    • 1 white onion, in large chunks
    • Celtic sea salt
    • filtered water
  • For the bacon and eggs:
    • 6 slices of bacon, preferably nitrate-free
    • 4 eggs, preferably from pastured hens
    • filtered water
  • For the salad:
    • 1/2 head romaine lettuce
    • 1/2 head red leaf lettuce
    • 2 small endives, diced
    • 2 ripe avocados, chopped
    • 1 cup cherry tomatoes, sliced in half
    • 3 Tb diced green onions, green parts only
    • 1/2 cup crumbled bleu cheese or goat cheese
  • For the dressing:
Cook the chicken: 
  1. Place the carrot, celery, and onion in a 4-qt pot. Add the chicken thighs, cover with filtered water, and add a generous pinch of salt. 
  2. Bring the pot of chicken to a low simmer. Cover the pot and allow the chicken to gently simmer for 40 minutes.
  3. Use tongs to remove the chicken from the pot and allow to cool until it can be handled easily. (The super-delicious broth leftover from cooking the chicken can be used for some other meal later on. It makes fantastic nutrient-dense white rice.)
  4. Once the chicken is cool enough, remove and discard the chicken skin. (Or feed it to the dog!) Remove the chicken meat from the bones, being careful to avoid any cartilage or other chewy bits. The bones can be saved for making chicken bone broth
  5. Chop the chicken into small pieces.
  6. The chicken can be prepared earlier in the day or even a day in advance of the meal. If so, just allow the chicken to sit out for a few minutes before adding it to the salad, so the chicken isn't refrigerator-cold. 
Cook the bacon:
  1. Cook the bacon until it is nicely crisp. My favorite way to cook bacon is to bake it in the oven at in a 9X13 glass baking dish. It takes about 20-30 minutes at 350 degrees, and seems to cook best on the bottom rack.
  2. When the bacon is done, place it on paper towels to remove the excess grease. Once the bacon is cool enough, it can be chopped or crumbled for the salad. 
  3. The bacon can be cooked earlier in the day or even a day in advance of the meal.
Boil the eggs:

  1. Boil the eggs to your liking. My preferred way to make boiled eggs is as follows: Put the eggs in a small pot and cover with plenty of water. Bring to a boil, then turn off the heat and cover the pot. Set a timer for 15-18 minutes (depending on the size of the eggs). When the timer goes off, pour out the hot water and then add cold water and ice to cool the eggs down quickly (so they don't continue to cook).
  2. Once the boiled eggs have cooled enough to handle, peel them. Chop the eggs into wedges or slices.
  3. The eggs can be boiled and peeled earlier in the day or even a day in advance of the meal.
Prepare the dressing:

  1. Combine the red wine vinegar with all other ingredients except for the olive oil.
  2. Whisk or shake vigorously to mix it all up. I like to use this salad dressing bottle so I can just put on the lid and shake it all together.
  3. Add about 1 tsp of the olive oil and whisk/shake vigorously again. Adding a small amount of oil first helps the dressing become better mixed so it won't separate back into oil and vinegar as quickly.
  4. Add the rest of the olive oil and whisk or shake to combine.

Prepare the salad:

  1. Rip the lettuce into bite-sized pieces and chop the endive. Wash and dry the lettuces and endive. A salad spinner works excellently for this. I use this method to easily wash and dry all of my salad greens.
  2. Chop up the avocado, slice the tomatoes, and dice the scallions.

Bring it all together:

  1. Place a generous amount of lettuce on each plate.
  2. Create stripes over top of the lettuce, adding the avocado, bacon, eggs, bleu cheese (or goat cheese), chicken, and tomatoes. Sprinkle the green onions over it all.
  3. Shake up the dressing and drizzle to taste.
  4. Serve and enjoy!


Affiliate Disclosure - Links to Amazon are affiliate links. If you use these links, your price remains the same, but I earn a small commission. Thanks for supporting this site! 

Sunday, September 25, 2016

Two Kombucha Flavors for Fall: Ginger Pear and Apple Cinnamon

As a nice change from our favorite kombucha flavor, in the Fall I like to make the most of autumn's seasonal fruits by making ginger pear and apple cinnamon kombucha. I originally posted these recipes several years ago, and thought I'd re-post them now that Fall has arrived.

Required Ingredients and Equipment

To make flavored kombucha, you need to start with some plain kombucha. You can see my recipe for making kombucha tea here. 

Once the fruit and spices are added, the kombucha is allowed to ferment for 2 days on the counter to develop the flavors and create a bit of fizz.

Mason jars work well for making these flavored kombucha drinks. If you want your kombucha to be extra fizzy, Fido jars work well.  

Recipe: Ginger Pear Kombucha

Ginger pear kombucha has a delicate pear flavor, just mildly sweet.

Makes 1 quart
  • 1/2 cup diced ripe pears (peeled or unpeeled)
  • 1/4 tsp finely minced fresh ginger (I use a garlic press to mince the ginger), or a couple smallish chunks of peeled ginger
  • 3&1/2 cups finished kombucha tea
  1. Combine all ingredients in a quart mason jar
  2. Cover tightly and allow to ferment for 1-2 days at room temperature. 
  3. Transfer to the refrigerator.  The pears can be left in while the kombucha is stored in the fridge. 
  4. If desired, the kombucha can be strained before drinking it to remove the pears. We think these fermented pears actually taste fabulous, so we like to leave them in.

Recipe: Apple Cinnamon Kombucha

This apple cinnamon kombucha tastes like tart apple cider.  It is refreshing and delicious!

Makes 1 quart
  • 2/3 cup peeled, diced sweet-tart apples (such as Fuji)
  • 1/4 tsp ground cinnamon, or 1/4 of a cinnamon stick
  • 3&1/2 cups finished kombucha tea
  1. Combine all ingredients in a quart mason jar
  2. Cover tightly and allow to ferment for 1-2 days at room temperature. 
  3. Transfer to the refrigerator.  If the apple cinnamon kombucha will not be consumed within a few days, its a good idea to strain out the apples before you store the kombucha in the fridge.
  4. Since the apples are fairly flavorless after the fermentation process, strain them out before serving the kombucha.  If you want the apple cinnamon kombucha to be more sweet like apple cider, feel free to stir in a bit of maple syrup into each glass.

What are your favorite kombucha flavors for Fall?

Links to Amazon are affiliate links. If you use these links, your price remains the same, but I earn a small commission. Thanks for supporting this site!

Monday, June 29, 2015

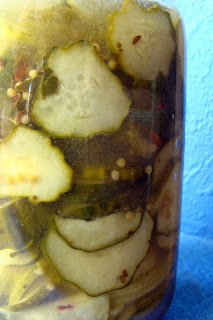
Fermented Bread and Butter Pickles (GAPS : primal : gluten- and grain-free : paleo)


This recipe for bread and butter pickles is the best fermented veggie I've had. Grown-ups love them, my kids love them, even people who don't typically eat fermented veggies love them.  These pickles are crispy and delicious. Even if you've disliked every fermented veggie you've tried, give these a shot!

This recipe is my favorite way to use up the abundant squash and zucchinis at this time of year. And, you can even reuse the brine and spices for another batch once the pickles are gone.

Fermented Bread and Butter Pickles
Makes 1 quart
  • 3-4 medium cucumbers (OR zucchinis or summer squash*)
  • 1 tsp mustard powder
  • ~20 celery leaves, a stalk of celery, OR a 1/4 tsp of dried celery seed
  • 1/2 cup raw mild honey
  • 1/2 cup raw apple cider vinegar
  • 1.5 Tb celtic sea salt
  • 2 Tb whey
  • 1 Tb mild pickling spice**
  • Equipment needed: quart mason jar or Fido jar, rock for weighing down the cucumbers (boil the rock in water for several minutes to make sure it is very clean), cloth tea bag (optional)
  1. In a medium bowl, combine mustard powder, honey, vinegar, salt, and whey.  Stir well to dissolve the honey and salt.  You may need to leave this sitting for an hour or two to get everything to dissolve and combine well.
  2. Wash the cucumbers and celery well.
  3. Remove and discard the ends from the cucumbers.  Slice the cucumbers evenly; I've used my favorite knife, a mandoline, or the food processor and they all worked wonderfully. 
  4. Add the celery leaves/stalk (if using) to the bottom of the jar.
  5. Put the pickling spice and celery seed into a cloth tea bag.  This makes it so that you won't have spices stuck to the pickles when it is time to eat them.  If you don't have a cloth tea bag, you could just put the spices in the bottom of your jar.  
  6. Add the cucumber slices to the jar, packing them down tightly.  Put in the cloth bag of spices around the middle of the jar and then keep packing in the cukes.
  7. Pour the honey/vinegar mixture over the cucumber slices.  
  8. Pack down the cucumbers so that they are covered by the liquid. If your cucumbers keep floating up to the top, try weighing them down.  I use a rock from my yard to hold the cukes down (I originally boiled the rock in water for a few minutes to make sure it was nice and clean, and then cooled it down before putting it on top of the cucumbers.)  There should be at least 1-inch of head space at the top of the jar.
  9. Scrape any spices or cucumber bits that are stuck to the jar back down into the liquid.  Then use a clean cloth or paper towel to wipe the inside of the jar above the liquid.  (This will help in making sure that the ferment works well and no funky stuff grows at the top of the jar.)
  10. Put a lid on the jar and leave at room temperature for 2 days; then transfer to the refrigerator. You can taste-test a pickle slice to make sure they are ready before moving them to the fridge. If you'd like them a little more pickled, leave them out for another day.
  11. Enjoy!  Once your pickles are all gone, don't throw out that brine and the remaining spices.  Rather, chop some more cucumbers, pack 'em into a clean jar, pour the brine/spices over them, and ferment again! The flavor of the second batch will be a little muted, but still totally tasty!
*Zucchinis and summer squash make great pickles too, BUT they will be soft instead of crispy.
**I buy Frontier brand mild pickling spice from the bulk section at the natural foods store.  If you can't find pickling spice, blog reader Brian has shared his recipe for pickling spice as follows:
Makes enough for 6 quarts of pickles
4 TBS yellow ground mustard
3 tsp cinnamon
1 TBS allspice
1 TBS dill weed
1 TBS celery seed
1 TBS red pepper flakes
1 tsp cloves
1 tsp caraway seed
1 tsp ground ginger


Links to Amazon are affiliate links. If you use these links, your price remains the same, but I earn a small commission. Thanks for supporting this site!

Wednesday, June 24, 2015

Triple Berry Kombucha

We've been brewing our own kombucha for over 4 years now. It is such a fantastic, healthy, probiotic drink, and it is one of our staple drinks. Once every two weeks, we bottle up 3 gallons of our finished kombucha and make a new batch to ferment. Our kids love to participate in the process of adding flavors and bottling the kombucha.

Over the last year, we have been loving Triple Berry Kombucha, made with strawberries, blueberries, and blackberries. We have tried individual berry flavors in the past but were dissatisfied with the flavor. With a little experimentation, I learned that a little lemon juice greatly enhances the flavor of berry kombucha. This combination of three types of berries gives the best flavor.

Required Ingredients and Equipment

To make flavored kombucha, you need to start with some plain kombucha. You can see my recipe for making kombucha here.  Once the fruit is added, the kombucha is allowed to ferment for one day on the counter to develop the flavors and create a bit of fizz.

Mason jars work well for making flavored kombucha. If you want your kombucha to be extra fizzy, Fido jars work well.  

Recipe: Triple Berry Kombucha

Makes 1 quart
  • 1/2 cup combined of strawberries, blueberries, and blackberries*
  • 1&1/2 tsp fresh lemon juice
  • 3&1/2 cups kombucha tea
  1. Combine all ingredients in a quart mason jar
  2. Cover tightly and allow to ferment for 1 day at room temperature. 
  3. Transfer to the refrigerator.
  4. Since the berries are fairly flavorless after the fermentation process, strain them out before serving the kombucha. 

Do you brew your own kombucha? What are your favorite kombucha flavors?


*Except during our local berry season, I find that frozen berries have far superior flavor to the fresh ones sold in grocery stores.
 
Links to Amazon are affiliate links. If you use these links, your price remains the same, but I earn a small commission. Thanks for supporting this site!

Friday, May 8, 2015

Homemade Ranch Dressing and Dip (probiotic : nutrient-dense)

Ranch dressing is a staple item in our household. We use it as a salad dressing, as a dip for veggie sticks and homemade pizza, and as a sandwich condiment. I previously blogged my original ranch dressing recipe 4 years ago; this new recipe is another version of ranch dressing that we have been enjoying for about a year now.  The milk kefir adds wonderful flavor and a good dose of healthy probiotics to this ranch dressing.


Homemade Ranch Dressing and Dip
  1. Combine all ingredients in a medium bowl or 2-cup measuring cup. (Putting all of the ingredients into a 2-cup measuring cup saves on having to dirty many different measuring cups.) Whisk or stir well to combine. 
  2. If possible, make this dressing at least an hour before it will be consumed, so the flavors have a chance to meld.
  3. Store leftovers in an airtight container in the fridge.  This ranch dressing will keep for at least a week. If separation occurs, just give it a quick stir before using it. 

Links to Amazon and Corganic are affiliate links. If you use these links, your price remains the same, but I earn a small commission. Thanks for supporting this site!
Sunday, February 1, 2015

Top 10 Easy Lunches

Although my children and I are at home for lunch most days, lunch preparation still needs to be quick and easy. We are so busy with schooling, my homeopathy practice, and homemaking that I like our lunches to be simple yet satisfying. While some of our favorite easy lunches do require a small amount of cooking, others would be easily packable for school or picnics as well.

Packable Easy Lunches

Liver Pate on Crackers or Toast
This simple lunch is an easy way to incorporate the top superfood (liver) into our diets. Our local healthfood store carries two different types of liver pate, and they are fantastic. (Our favorite one is Duck Liver Mousse with Cognac.) My son and I, especially, enjoy eating pate regularly. I simply spread some pate over crackers or toasted, buttered sourdough bread. Bread and Butter Pickles make a great complement and round out this lunch. 

Chopped Salad with Seasonal Veggies
In the warm months, especially, I often rely on a quick salad for my lunch. One specific combination that I enjoy is Lemon Basil Chopped Summer Salad.  I also enjoy combining any veggies I have on hand with chunks of fresh mozarella, such as bell peppers, pickled beets, tomatoes, grilled artichokes, and avocado.  Topped with just a squeeze of lemon juice and a sprinkle of salt & pepper as a dressing, served with a few crackers on the side: this is one of my staple lunches for the warm months.  

Apple, Nut Butter, Cheese, and Crackers
A very simple lunch that my children both enjoy is sliced apple served with cheddar cheese, nut butter, and crackers. My daughter is still not tolerating gluten well, but she has been enjoying gluten-free buckwheat crackers lately. For nut butter, we use either homemade nut butter made from crispy nuts, or our favorite store-bought organic dark-roasted peanut butter

Lunchmeat Rolls
Back in our grain-free diet days, we started eating turkey or ham rolls as an easy meal. These have remained on our easy lunch menu ever since. To make a roll, I lay out a slice of lunchmeat flat. Then I top the meat with a small slice of cheddar cheese, a slice of fermented dill pickle, a drizzle of homemade honey mustard (which is just a 50/50 mix of raw honey and Natural Value Dijon mustard), and a little lettuce. Then I just roll it all up. If we are taking these to-go, I may use toothpicks to keep the roll-ups from unrolling. We typically eat ham or turkey rolls with a side of our favorite chips.
 
Peanut Butter and Jelly Sandwich
Peanut butter and jelly sandwiches were always my favorite lunch as a child, and I am glad that these days I am able to share that with my own children. To make these sandwiches even healthier, I spread softened nutrient-dense butter on the bread before adding the peanut butter and all-fruit jam

My daughter enjoys her PB&J on a toasted homemade gluten-free waffle (which I make in bulk once every 4-6 weeks and freeze in pairs for easy use). My son enjoys his PB&J on lightly toasted sourdough bread. (If I am going to be packing these sandwiches to-go, I toast the bread and waffle a bit extra so they won't get too mushy in the intervening hours before lunch.)

Ants on a Log
Another simple lunch that my children both enjoy (and can make themselves) is Ants on a Log. This is made by smearing nut butter onto celery sticks (which become the “logs”), and then topping the nut butter with raisins (which are the “ants”). My daughter sometimes objects to the stringiness of celery, in which case I may make her ants on a log with carrots or buckwheat crackers instead of celery.

Tuna Salad Sandwich
Everyone in my family loves tuna salad sandwiches. I make a very simple tuna salad by combining the following:
To make the sandwiches, I simply top toasted, buttered bread (or homemade gluten-free waffle for my daughter) with the tuna salad, and serve it with our favorite chips. Yum!

Easy Lunches That Require a Little Cooking

Grilled Cheese Surprise
Grilled cheese is another classic lunch that we enjoy. I make our grilled cheese sandwiches with crusty sourdough bread (or on a homemade gluten-free waffle for my daughter). I butter the outside of the bread so it will brown up nice and crispy when I cook it in a cast-iron skillet. (When using a waffle for a grilled cheese sandwich, it is essential to cook it longer over lower heat so the waffle does not burn.) 

Our basic grilled cheese sandwich is made with just cheddar cheese. However, I also like to fancy it up sometimes by adding one or two of these surprise ingredients:
Leftovers
One of the easiest lunches is leftovers. Whenever possible, while making dinner I will make extra portions to freeze. I freeze the leftovers in 2-cup glass bowls that can be re-warmed in a toaster oven. My husband takes these frozen lunches to work every day, and since I freeze meals every week he always has at least a few different options to choose from. I also occasionally eat these frozen meals for lunch at home.

Salmon with Tartar Sauce
My husband and daughter are not big fans of salmon, but my son and I both love it. Lunch is a great time for us to enjoy salmon, when I can easily make something else for my daughter. (Dinnertime is a no-substitution meal for us; everyone is expected to contentedly eat whatever I make for dinner so my best bet is to not make salmon for dinner.) Although there are many more complicated ways to make salmon, at lunch I like to make it very simply by pan-searing it in refined coconut oil in a skillet on the stovetop.

We live far away from the ocean, and the best wild-caught salmon we can obtain is frozen. I simply rinse the salmon to melt the ice that usually coats it, then pat it dry with a paper towel. I season the salmon with salt and then cook it for about 4-5 minutes per side over medium heat. I love the way the skin gets crispy with this cooking method.

While the salmon cooks, I make a simple tartar sauce as a condiment. My son and I will typically eat the salmon with a piece of buttered toast or salad as an easy side dish.
 
Egg, Toast, and Caramelized Veggies
One of my favorite simple meals is fried eggs with toast and caramelized veggies. This is a great meal for breakfast, lunch, or dinner. To make caramelized veggies, I simply saute frozen veggies in plenty of butter on medium-high heat, stirring often so they won't burn. My method for perfect fried eggs is as follows:
  • I like to cook my eggs in a well-seasoned cast iron skillet. The trick to preventing the eggs from sticking is to melt plenty of butter in the skillet, swirl it around well, and then add the eggs once the skillet is rather warm. Do NOT add eggs to a cool cast-iron skillet, else they will stick! I use about 2 tsp of butter per egg. 
  • Fry the eggs over medium heat in the melted butter. To make sure the yolks won't break, I wait to flip the eggs until the whites are well set.  I then give the skillet a gentle shake to loosen the eggs before flipping them. 
  • I have one very small cast iron skillet that is perfectly sized to fry one or two eggs, and with a quick toss of the wrist I can flip the eggs without having to dirty a spatula.  My kids love to watch me do this, and they call it my magic trick.  If you're not feeling brave enough to flip eggs in that way, use a plastic spatula instead. (Flipping eggs is one of the rare uses for my nylon spatula; I prefer not to use plastic in any heated applications, but I find that my metal spatula breaks the egg yolks very frequently.)
  • As soon as I flip the egg(s), I turn off the heat and let the eggs cook for just a few seconds in the residual heat left in the skillet. Don't leave them too long, else the yolk will cook completely.
  • Sprinkle some celtic sea salt over each egg before serving.

What are your favorite easy lunches?


Links to Amazon are affiliate links. If you use these links, your price remains the same, but I earn a small commission. Thanks for supporting this site!

Wednesday, June 18, 2014

Superfood Soda Concentrate (nutrient-dense : raw)

Refreshing, tart, and sweet: my family has been enjoying this simple drink concentrate for over a year. It combines two traditional superfoods, raw honey and raw apple cider vinegar, which combine to make an uber-healthy, wonderfully tasty drink.

I have hesitated to share this recipe, because it is so simple and easy to make.  But after having multiple friends ask me for the recipe, I figured my blog followers would like to know it, too.

Superfood Soda Concentrate

  1. If your raw honey has become thick and crystallized, warm it up by placing the jar in a bowl of warm water. This will allow the honey to become thin and pourable. 
  2. Combine equal parts of raw honey and apple cider vinegar. My favorite way to do this involves no measuring and minimal cleanup: Use a half-full jar of raw apple cider vinegar. Place a funnel into the jar, and pour in the honey through the funnel.  It may take a couple refills of the funnel depending on the size of your vinegar jar and funnel. Be patient, as the thick honey can take quite awhile to drip through the funnel; I like to find something else to do in the meantime.
  3. Put a tight-fitting lid on the jar.  Over the next day or two, periodically invert the jar and swish the contents around. It can take awhile for the honey to fully dissolve into the vinegar. 
  4. Once the honey has been fully dissolved in the vinegar, the soda concentrate is ready!
  5. To make a drink, simply pour some of the concentrate into a glass, add your favorite sparkling mineral water, and stir.  The amount of concentrate to use will vary depending on your preference. I like to use roughly 3-4 Tb of concentrate per one cup of fizzy water.
  6. If you don't like fizzy drinks, this same concentrate can be combined with plain, filtered water for a nice electrolyte drink.  When using plain water, I use less of the concentrate, about 1-2 Tb per cup of water.

What is your favorite summertime drink?

 Links to Amazon are affiliate links. If you use these links, your price remains the same, but I earn a small commission. Thanks for supporting this site!

Monday, July 1, 2013

July 4th Recipe Round-up Including a Recipe for Fried Rats (GAPS : grain-free : Primal : gluten-free)

The 4th of July has always been one of my family's favorite holidays.  Here in the hot dry desert, the arrival of early July ushers in the monsoon season, when we will get the majority of our 8.5-inches of annual rainfall.  We finally start to see a break from the 100+ degree days, and the 4th of July is a great time to celebrate the change.

We spend time with family, watch the kids play in water, and enjoy a great meal.  Our July 4th is usually a potluck, so no one has to spend too much time cooking.  Then the evening is topped off with lots of fireworks.

July 4th Recipes

All of these recipes are grain-free, and the majority are GAPS-legal, too. The recipe for fried rats is below under "Side Dishes".

Main Courses
Side dishes
  • Grilled zucchini or summer squash - Simply slice squash lengthwise about 1/3-inch thick.  Drizzle with oil, sprinkle with salt and pepper, and grill them!
  • Probiotic potato salad
  • Lemon basil chopped summer salad - This salad showcases the flavors of summer's bounty.
  • Fermented bread and butter pickles - This fermented recipe keeps everyone coming back for more, even people who don't usually eat fermented foods.
  • Kale chips - These salty, crispy snacks are a yummy addition.
  • Creamy cukes with beautiful salmon roe - This recipe is extremely simple and delicious. 
  • Raw veggie sticks with homemade ranch dip
  • Summer roasted vegetable medley
  • Fried rats - My friend Linda is always requested to bring this delicious dish to every potluck. And no, this recipe doesn't actually include rats, but the jalapeno stems look like little rat tails. Fried rats are unbelievably scrumptious, and not too spicy if prepared properly.
    • Ingredients: 
      • jalapenos (of roughly the same size), with stems attached and preferably straight rather than curved
      • cream cheese
      • bacon, preferably thick-sliced
    • Method: 
      • Slit the jalapenos down one side, and remove the seeds/membranes/veins using a small spoon. The more of those bits that are left in the jalapenos, the spicier they will be. Be careful, those seeds and bits are so hot that any residual oil on your skin will burn your eyes for days afterwards. I like to wear disposable latex gloves to prevent that, and be very careful not to touch my skin (and especially not lips or eyes) with the spicy stuff.
      • Stuff the jalapenos with cream cheese.  A small butter knife with rounded ends would work well for this. 
      • Wrap a slice of bacon around each jalapeno.  Place them in a baking dish, and bake in a 400-450 degree oven for about an hour, until the jalapenos are fully cooked and the bacon has started to crisp up.
Desserts

What foods will be gracing your Independence Day table?

This post may contain Amazon affiliate links.  If you use these links, your price will be the same but I may earn a small commission.

Saturday, June 15, 2013

Fresh Fruit Salad (GAPS : primal : no refined sweeteners)

This fruit salad is amazingly simple to make and leaves us all licking scraping our bowls every time. The sauce is sweet, tart, and delicious thanks to honey, lemon juice, and my secret ingredient: a dash of milk kefir!  That secret ingredient lends just a touch of creaminess to the sauce, and also makes this fruit salad a source of probiotics too.

This fruit salad delicious on it's own, and can be dressed up for dessert with some sweetened whipped cream or homemade ice cream.  It also makes a great dish for potlucks and community dinners.

Fresh Fruit Salad
  • 2-3 medium lemons, to make 1/4 cup fresh lemon juice
  • 1/4 cup raw mild-flavored honey
  • 2 Tb plain milk kefir, preferably made from raw milk (you could substitute whole plain milk yogurt)
  • pinch of finely ground celtic sea salt
  • 6 cups chopped fresh fruit of your choice
    • Our favorite fruit combination includes:
      • 2 ripe bananas, sliced
      • 2-3 sweet apples, cored and diced
      • a couple handfuls of frozen blueberries*
      • 1 cup frozen strawberries*, sliced
      • sweet-tart fruit such as 2 kiwis or an orange
  1. Juice the lemons to make 1/4 cup of fresh lemon juice.  I find that a reamer works wonderfully to get lots of juice out of each lemon.
  2. Combine the lemon juice, raw honey, milk kefir, and pinch of salt in a small bowl.  Use a fork to stir a bit, but don't worry that the honey will still be chunky right now.  The honey will have time to dissolve more fully while you prepare the fruit.
  3. Chop and dice all of the fruit. Combine it in a large glass bowl**. 
  4. Stir up the lemon juice/honey mixture until the honey is fully incorporated.  
  5. Pour the lemon/honey mixture over the fruit.
  6. Cover the bowl and let it chill in the refrigerator for at least 20 minutes.  Overnight is fine too, although some of the fruit will soften a bit.
  7. Since the fruit will have released it's juice, give this a quick stir immediately before serving. This is delicious by itself or fancied-up with sweetened whipped cream (recipe follows) or vanilla ice cream.
*I find that, outside of local berry season, frozen berries have superior flavor and price compared to the fresh berries available in stores.
**Because this fruit salad contains acidic lemon juice, I make sure to store it in a glass bowl.  The lemon juice could probably leach plastic from a plastic bowl.

Sweetened Whipped Cream

  1. Beat the cream and salt together until the mixture starts to get thick and fluffy.  I like to use my Kitchen-Aid stand mixer with the wire whip attachment, but you could also use a hand mixer.
  2. Add the vanilla extract, and drizzle in the honey while the mixer is running.  Alternatively, you could drizzle in the honey a little at a time and mix between each honey addition. 
  3. If you're using a stand mixer, use a silicone spatula to scrape down the sides of the bowl a few times to make sure you don't have any clumps of honey at the bottom.  I like to beat it until it gets a bit stiff since it will tend to soften up a bit in the fridge over the next few days.
  4. Store the whipped cream in the fridge in an airtight bowl.
***If your raw honey is very crystallized, place it over a bowl of warm water to make it a bit runny.

Thursday, May 23, 2013

Sweet and Sour Snow Peas (fermented : grain-free : GAPS : primal)

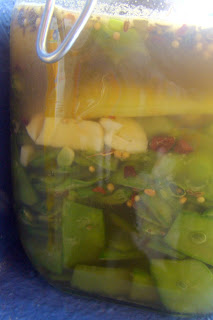
Since my mom had her usual bumper crop of snow peas this spring, I came up with a new fermented veggie that is especially loved by my 3-year-old son: sweet and sour snow peas!  These are deliciously crispy, tangy, and sweet, with just a little tad of a spicy bite from some added garlic.  What a yummy way to get some probiotics.

Sweet and Sour Snow Peas
  • ~3.5 cups of snow peas
  • 3 medium cloves of garlic
  • 1 tsp mustard powder
  • 1 stalk of celery, OR a generous pinch of celery seed
  • 1/2 cup raw mild honey
  • 1/2 cup raw apple cider vinegar
  • 1.5 Tb celtic sea salt
  • 2 Tb whey
  • 1 Tb pickling spice*
  • Equipment needed: quart mason jar or Fido jar, rock for weighing down the peas (boil the rock in water for several minutes to make sure it is very clean)
  1. In a medium bowl, combine mustard powder, honey, vinegar, salt, pickling spice, celery seed (if using) and whey.  Stir well to dissolve the honey and salt.  You may need to leave this sitting for an hour or two to get everything to dissolve and combine well.
  2. Wash the peas and celery stalk well. Remove and discard the ends from the peas. 
  3. Peel the garlic and check to make sure it looks very good. (I would not use any garlic that has brown spots in a fermented food, as I want to make sure I'm not introducing any molds to the jar.) Slice the garlic.
  4. Pack the peas, celery, and garlic into the jar.
  5. Pour the honey/vinegar/spice mixture over the veggies.  
  6. Pack down the veggies so that they are covered by the liquid. If your peas keep floating up to the top, try weighing them down.  I use a rock from my yard to hold the peas down (I originally boiled the rock in water for a few minutes to make sure it was nice and clean, and then cooled it down before putting it on top of the veggies.)  There should be at least 1-inch of head space at the top of the jar.
  7. Scrape any spices or veggie bits that are stuck to the jar back down into the liquid.  Then use a clean cloth or paper towel to wipe the inside of the jar above the liquid.  (This will help in making sure that the fermentation process goes well and that no funky stuff grows at the top of the jar.)
  8. Put a lid on the jar and leave at room temperature for 2 days; then transfer to the refrigerator.
  9. Enjoy!  These peas make a great probiotic side dish, or a crispy snack any time.
  10. Once your peas are all gone, don't throw out that brine and the remaining spices.  Rather, prepare some more veggies (such as peas, onions, zucchini or cucumber slices), pack 'em into a clean jar, add some fresh spices, pour the brine over them, and ferment again! This is a great way to make the most of the brine ingredients.
*I buy Frontier brand mild pickling spice from the bulk section at the natural foods store.  The pickling spice is a mixture of organic yellow mustard, organic cinnamon chips, organic allspice, organic dill seed, organic celery seed, organic bay leaf, organic mild chilies, organic cloves, organic caraway, and organic ginger root.

Tuesday, March 26, 2013

How to Make Flavored Kombucha Tea

We've been brewing our own kombucha tea for several years now.  We brew multiple gallons of kombucha at a time, and over the last year or so we've experimented quite a bit with making different flavors. Making flavored kombucha tea is really quite simple to do, but there are some subtle differences to making each flavor the best it can be.

Start with Some Finished Kombucha

To make flavored kombucha, you need to start with some plain kombucha. You can see my recipe for making kombucha tea here. We pour the finished kombucha into 2-cup jars and flavor each jar individually. We like to save bottles from the GT's kombucha sold in stores for this purpose, and we also use mason jars.  If you want your kombucha to be extra fizzy, Fido jars work well.  I wouldn't recommend using bottles with very small openings with this method, as it will be particularly difficult to clean them out and make sure that all the flavoring bits are removed.

Our Favorite Flavors

These are the flavors we keep making time and time again. With all of these flavors, a short fermenting time on the counter helps develop the flavors and create a bit of fizz.  The ideal fermenting time varies a bit with each flavor, so read below for specific details.  All of the amounts listed below correspond to a 2-cup (16-ounce) jar of plain kombucha.
  • Raspberry - Raspberry kombucha is slightly sweet and delicious.  This is a great flavor to use for people who haven't learned to love the tanginess of kombucha quite yet.
    • I find that frozen raspberries have the best flavor and the least chance of any mold contamination. The berries you use must be absolutely mold-free, else the kombucha will be nasty.
    • Add ~6 raspberries to each jar. 
    • Leave the jar to ferment on the counter for 2 days and then transfer to the refrigerator.
    • When pouring the raspberry kombucha from each jar, a fork can be used to keep the berries from falling into each drink.  Our backyard chickens absolutely love to eat these kombucha-flavored berries, but they would also be a great addition to the compost heap.

  • Fresh Ginger - Fresh ginger added to kombucha makes an amazingly refreshing drink.
    • Use either a garlic press or a juicer to prepare the ginger. I do not recommend chopping/mincing the ginger for use in kombucha because it is rather fibrous.  Using a garlic press or juicer will remove most of the fibrous material, and the kombucha is much better without it. I slice the ginger into roughly 1/4-inch pieces before pressing it in my garlic press. 
    • Add the pressed/juiced ginger to each jar of kombucha.  Even a small amount (< 1/8 tsp) of ginger per jar is delicious, but for the best flavor I like to use a larger amount (~1/4 tsp).
    • Leave the jar to ferment on the counter for 1-2 days and then transfer to the refrigerator.
    • We drink this kombucha and the ginger bits without straining it.
  • Lemon - Lemon kombucha is superb!  Such a simple, fresh flavor.
    • Use a reamer to juice some lemons. Don't be tempted to just squeeze the lemons, as you will get MUCH more juice using a reamer. It is fine if there is pulp along with the juice, but be sure to remove any lemon seeds.
    • Add 1-3 tsp lemon juice per jar. Using 3 tsp will give you a nicely tart drink, whereas 1 tsp of lemon juice adds a more mild flavor.
    • Only allow lemon kombucha to sit on the counter for 12-15 hours. If it sits out longer, it will grow lots of little SCOBY bits that aren't desirable for drinking.
    • We drink lemon kombucha without straining out the pulp.
  • Lemon Ginger - Lemon and ginger combine to make a very tasty drink.
    • Prepare the ginger and lemon juice using the same methods described for the lemon and ginger kombuchas.
    • Add 1/4 tsp ginger and 2 tsp lemon juice to each jar.
    • Only allow ginger lemon kombucha to sit on the counter for 12-15 hours. If it sits out longer, it will grow lots of little SCOBY bits that aren't desirable for drinking.
  • Lemon Raspberry - Lemon raspberry kombucha is reminiscent of raspberry lemonade, but with a delicious tanginess.
    • Prepare the lemon juice using the same method described for the lemon kombucha.
    • Add 6 raspberries and 2 tsp lemon juice to each jar.
    • Only allow lemon raspberry kombucha to sit on the counter for 12-15 hours. If it sits out longer, it will grow lots of little SCOBY bits that aren't desirable for drinking.
  • Triple Tasty! Ginger, Lemon, and Raspberry - For an extra flavor punch, try combining all three flavorings.
    • Prepare the ginger and lemon juice using the same methods described for the lemon and ginger kombuchas.
    • Add 4 raspberries, 1/4 tsp ginger, and 2 tsp lemon juice to each jar.
    • Only allow triple kombucha to sit on the counter for 12-15 hours. If it sits out longer, it will grow lots of little SCOBY bits that aren't desirable for drinking.

Some Flavors We Haven't Enjoyed

There are a few flavors of kombucha we have tried that did not turn out so well: strawberry, orange, blueberry, and blackberry.  They are still drinkable, but nearly as tasty as our favorite flavors.

Do you brew your own kombucha?  Do you enjoy it plain, or flavored?  What is your favorite flavor?

This post is part of Fat Tuesday! 

Friday, March 1, 2013

Homemade Spiced Ketchup (primal : GAPS : gluten-free)


While we enjoy my basic ketchup recipe as well, lately we've really been enjoying this spiced ketchup recipe. This ketchup is a bit sweeter and more like store-bought ketchup than my other recipe. It is a bit like a cross between ketchup and barbecue sauce. The ketchup is great on bunless burgers, hot dogs, and with french fries.

Since this ketchup is fermented, it is a great source of probiotics too!
Homemade Spiced Ketchup
Makes 1 quart


  1. Combine all ingredients in a bowl (if using a quart mason jar, you can save on dirty dishes by mixing this up directly in the jar). Stir well to combine. If using pint mason jars, pour the ketchup into the jars.
  2. Ensure that the top of the ketchup is at least 1-inch below the top of the jar(s).
  3. Using a clean cloth or paper towel, wipe the top of the jar above the ketchup clean.
  4. Put a lid on the jar and leave at room temperature for 3 days; then transfer to the refrigerator.