Showing posts with label gluten-free. Show all posts

Friday, December 15, 2017

Hot Cocoa Mix - 3 ingredients and NO refined sweeteners!

Things have been pretty quiet here on the blog lately, as I am in the process of creating a new website! This will be the last new content on this site, and I'm trying to get a bunch of the content from this site moved over to the new website. I will let you all know when it is ready!

In the meantime, I wanted to share this super simple recipe for hot cocoa mix. With only 3 ingredients, and no unrefined sweeteners, this hot cocoa mix is great to have on-hand for the cold months.  This mix, when combined with whole milk, makes for a delicious, not-too-sweet cup of hot cocoa

Hot Cocoa Mix

Combine all ingredients in a jar with a lid. Shake well to combine.

Hot Cocoa 

Makes 1 cup of hot cocoa
  • 1 cup of whole milk, preferably raw milk
  • 3 Tb hot cocoa mix
  1. Put the milk in a small saucepan over medium heat. Whisk in the hot cocoa mix until it is well-dissolved into the milk.
  2. Heat the cocoa, stirring occasionally, until it reaches the desired temperature. NOTE: If you want to keep your milk "raw", make sure you don't heat it past 110 degrees F. This also ensures that the milk is the perfect temperature for kids to drink without having to blow on it or burn their tongues.  You can check the temperature of the milk with a thermometer, or just by testing it with your finger. It will be getting close to 110 degrees when it is just starting to feel quite warm (but not burning hot) when tested with a finger.* 
  3. If you aren't concerned about keeping the milk raw, then go ahead and heat until nice and hot.
  4. Serve immediately.  If you find that the warm cocoa cools too quickly for slow drinkers, try serving it in a thermos.
  5. If desired, this hot cocoa can be topped with homemade whipped cream.
*If you decide to test the temperature with your finger, please use common sense and be careful. If the milk is anywhere near to simmering or boiling, it can absolutely burn you.


Affiliate Disclosure - Links to Amazon are affiliate links. If you use these links, your price remains the same, but I earn a small commission. Thanks for supporting this site!

Monday, November 6, 2017

Falafel with Jajeek - Fried Chickpea Patties with Cucumber Yogurt Sauce (gluten-free)

As part of our ancient history studies this Fall, I am digging into foods from ancient Mesopotamia, (which is in the region that is now known as the Middle East). Archaeological evidence shows that chickpeas were one of the earliest crops to be used in farming, as domesticated chickpea remains have been found dating back to around 10,000 years ago. In relatively modern times, one of the most common ways to cook chickpeas is to make them into falafels.

Falafels are delicious fried dough patties made with ground chickpeas, onions, and spices. While we had previously only enjoyed falafels when eating at a local Middle Eastern restaurant, my family has been delighted that I can now make falafels at home. The easiest way to make falafel dough is with a food processor, which makes it easy to grind the ingredients together. I have chosen to make our falafels into patties, so that I don't need to use quite so much oil when frying them. If you have a deep fryer, you could certainly make this falafel recipe into balls instead of patties.

My falafel recipe begins with soaking dried chickpeas in an acidic medium overnight. This important step reduces the phytic acid antinutrient that is naturally present in grains and legumes. Once the falafels are cooked, they are topped with jajeek, which is an Iraqi cucumber yogurt sauce. Falafel and jajeek are delicious in a salad or on pita bread.

Falafel with Jajeek - Fried Chickpea Patties with Cucumber Yogurt Sauce

Falafel - Fried Chickpea Patties
Makes 28-30 falafels
  1. Place the chickpeas in a large glass bowl. Cover the chickpeas with plenty of filtered water, enough for them to easily double in size. Stir in 1 Tb raw apple cider vinegar. Allow to soak overnight.
  2. In the morning, drain the chickpeas. Add fresh water and another tablespoon of apple cider vinegar. Allow to soak until about an hour before dinner.
  3. Drain the chickpeas well. With a 7-cup food processor, this recipe works best if you mix up the ingredients in two batches.
  4. Put half of the chickpeas and half of the falafel flavoring ingredients into the food processor. A lemon reamer works well to juice the lemon. Pulse and process until the mixture is finely ground. Dump into a large bowl.
  5. Place the remaining half of the chickpeas and falafel flavoring ingredients into the food processor.  Pulse and process until the mixture is finely ground. Add this mixture to the rest of the falafel mixture in the large bowl.
  6. Use a 3Tb scoop to create falafel balls. Place the falafel balls on a large cutting board or plate. Use your hands to flatten the falafels into patties that are ~3/4 inch thick.
  7. Begin to heat up a heavy-bottomed skillet. I like to use two 10-inch cast iron skillets to cook the falafels so that they are done cooking much more quickly.  Add enough oil to the pan to give an oil depth of ~1/3 to 1/2 inch.
  8. Once the oil is shimmering and hot (but NOT smoking), add the flattened falafel patties. Make sure to leave enough room so that the falafels are not touching each other, and will be easy to turn.
  9. Allow the falafels to cook undisturbed for a few minutes until they've reached a medium brown color. Carefully flip over each falafel patty using tongs or a spatula. Cook the second side for a few minutes until you've achieved the same medium brown color.
  10. Line a plate with paper towels. Place the cooked falafels on the paper towels to drain any excess oil.
  11. Serve the falafels with jajeek, lettuce, tomatoes, and/or pita bread.


Jajeek - Iraqi Cucumber Yogurt Sauce
Makes ~3 cups


  • 1&1/2 cups plain, whole milk Greek yogurt
  • 1&1/2 tsp dried mint
  • 1/2 tsp finely ground Celtic sea salt
  • 1/4 tsp pepper
  • 1 small clove of garlic, minced or pressed
  • 2 Tb fresh lemon juice
  • 2 cups chopped cucumber (if the skin is thick, peel the cucumbers!)
  1. Combine the yogurt, mint, salt, pepper, garlic, and lemon juice in a medium bowl. A lemon reamer works well to juice the lemon. Stir to combine.
  2. Stir in the chopped cucumbers.
  3. Store in the refrigerator while you prepare the falafel. 


Links to Amazon are affiliate links. If you use these links, your price remains the same, but I earn a small commission. Thanks for supporting this site!

Wednesday, October 25, 2017

Grain-Free Zucchini Bread

As the warm season is drawing to a close here, we've been enjoying lots of zucchini bread. This recipe gets a nutrition boost from zucchini, sucanat (unrefined sugar, complete with minerals), and nutrient-dense butter. This recipe is moist, lightly sweetened, and delicious!

Since this recipe is grain-free, everyone in my family has enjoyed eating zucchini bread as much as they want to. This recipe makes a great breakfast, or a snack for any time of day.

Grain-Free Zucchini Bread

  • 1 stick (1/2 cup) of butter
  • 3/4 cup tapioca starch
  • 1/2 cup coconut flour
  • 1/3 cup arrowroot starch
  • 1/2 cup sucanat
  • 1 tsp baking soda
  • 1/2 tsp finely ground Celtic sea salt
  • 1&1/2 tsp Ceylon cinnamon
  • 3/4 tsp ground nutmeg
  • dash of dried ginger
  • dash of dried allspice
  • 3/4 cup whole milk kefir (or substitute plain, whole milk yogurt)
  • 3 eggs, preferably from pastured hens
  • 1 tsp vanilla extract
  • 2 medium small zucchinis (to make 2 lightly-packed cups of shredded zucchini)
  1. Preheat the oven to 350 degrees F.
  2. Melt the butter in a small saucepan over low heat. Turn off heat and allow to cool a bit.
  3. Generously butter the sides and bottom of a loaf pan. (I use a 9.5X4.5 glass pan.) If desired, you could line the baking pan with parchment paper to make it very easy for the bread to be removed from the pan. The butter makes a nice "glue" that allows the parchment paper to stick to the inside of the pan.
  4. Combine the tapioca starch, coconut flour, arrowroot starch, sucanat, baking soda, salt, and spices in a large bowl. Whisk to mix it all together well.
  5. Combine the kefir, vanilla, and eggs in a small bowl or pourable measuring cup. Mix together with a fork.
  6. Shred the zucchinis using a box grater. There is no need to peel the zucchinis.
  7. Mix the kefir mixture into the dry ingredients using a hand mixer.
  8. Mix the butter into the batter using a hand mixer.
  9. Fold in the shredded zucchini.
  10. Pour the batter into the greased loaf pan and smooth out the top with the back of a spoon or spatula.
  11. Bake at 350 degrees for about 55-65 minutes.  It will be done when it is set in the middle (you can lightly touch it, or check to see if a toothpick comes out clean).
  12. Let cool for about 10-15 minutes, and then use a spatula or knife to go around the edges.  Invert the pan and move the bread to a cooling rack.  Remove the bread from the pan when it is mostly cool.
  13. Slice the bread, and serve! A Rada bread knife works excellently for slicing this bread.  
  14. Store leftovers in an airtight container in the fridge or freezer. If you're freezing it, place parchment paper between the slices so they will be easy to separate later on. We like to re-warm this bread in the toaster oven and serve it with a smear of butter and perhaps some cream cheese or goat cheese.


Links to Amazon are affiliate links. If you use these links, your price remains the same, but I earn a small commission. Thanks for supporting this site!

Friday, October 20, 2017

Fresh Tomato Salsa

My 10-year-old daughter has been learning to cook simple meals for our family, and quesadillas are one of her favorite things to make. I'm not sure if everyone knows what quesadillas are, but in case you don't know, quesadillas are simply tortillas, buttered on the outside, and filled with cheese. We cook them until they are crispy in a skillet.

Quesadillas are a very common food here in the southwestern USA, but we didn't eat them for years since my husband and daughter were not eating many grains. Recently, though, we have found excellent grain-free tortillas, and we've been so excited to once again eat quesadillas.

October is panning out to be the month of the tomato here, with lots of tomatoes fresh from our garden. Fresh salsa and sour cream are perfect accompaniments to quesadillas. This recipe for fresh tomato salsa is very simple. I've purposely made it with ingredients I generally have on-hand by substituting coriander and cayenne pepper for the typical fresh cilantro and jalapenos.


Fresh Tomato Salsa 

  • 1 cup fresh ripe tomatoes, chopped
  • 2 green onions, sliced thinly
  • 2 tsp fresh lime juice
  • 1/4 tsp salt
  • 1/8 tsp coriander
  • 2 dashes cayenne pepper (use more if you like your salsa very spicy)
  1. Chop the tomatoes and slice the green onions.
  2. Juice the lime. A lemon reamer works great for this.
  3. Combine all ingredients in a bowl and stir to combine.
  4. Serve immediately. Fresh tomato salsa is great with tortilla chips, quesadillas, or tacos.


Links to Amazon are affiliate links. If you use these links, your price remains the same, but I earn a small commission. Thanks for supporting this site!

Tuesday, October 17, 2017

Bacon and Cheddar Baked Potatoes (grain-free : gluten-free : nutrient-dense)

Baked potatoes are usually served as a side dish, but in this recipe they are elevated into the main course. Topped with bacon, cheese, sour cream, and green onions, this recipe for baked potatoes makes a simple, delicious dinner meal. Because I bake both the potatoes and the bacon in the oven, this meal requires very little hands-on cooking time. That makes this one of the easiest meals I can make for my family on a busy day.

Bacon and Cheddar Baked Potatoes

Serves 4

  • 4 Yukon Gold Potatoes, preferably organic*
  • 8 slices (half a pound) of bacon, preferably nitrate-free (I prefer Coleman Applewood Smoked Uncured Bacon
  • 4 ounces cheddar cheese, shredded
  • 4 Tb butter, preferably nutrient-dense yellow butter
  • 4 Tb sour cream, preferably from grassfed cows 
  • 2 green onions, green parts only
  • salt and pepper
  1. Wash the potatoes well. Dry the potatoes on a kitchen towel.
  2. Use a fork to stab the potatoes several times on each side. 
  3. Place the potatoes directly on the oven rack in the middle of the oven (or, if preferred, you can bake them in an oven-safe baking dish). 
  4. Bake the potatoes at 350 degrees for about one hour. Smaller potatoes may cook quicker and larger potatoes will likely take a little longer than an hour to cook. 
  5. Meanwhile, place the bacon in a 9X13 glass baking dish.  I like to go ahead and bake a whole package of bacon at a time, so there will be a little bacon leftover. Spread the slices of bacon out as evenly as possible, and it is fine that there will be a bit of overlap between the slices. 
  6. Place the bacon on the bottom rack of the oven. This will allow the bacon to crisp up nicely in the oven. The bacon will need to cook for about 30-40 minutes, until it is done to your preferred level of crispiness. Remove the bacon from the oven once it is as crispy as you prefer. 
  7. To check the potatoes for doneness, cover your hands with oven mitts or thick kitchen towels and then very carefully give the potatoes a little squeeze. They will be slightly soft when done. 
  8. Once the potatoes are soft, remove them from the oven. 
  9. Allow the potatoes to cool for a few minutes. If desired, the bacon can be moved to a paper-towel-lined plate to drain off the excess bacon grease.
  10. In the meantime, thinly slice the green parts of the green onions. Chop the bacon into small pieces. (Kitchen shears work fabulously for chopping the bacon and green onions.)
  11. Shred the cheddar cheese with a box grater
  12. Place each potato on a plate. Carefully slice the potatoes open. (BEWARE: hot steam will likely come out of the potatoes.) 
  13. Add a generous pat of butter to each potato. Sprinkle with salt. 
  14. Top the potatoes with the shredded cheddar cheese, bacon bits, and green onions. 
  15. If desired, drizzle a bit of the leftover bacon grease on top of each potato. Add a scoop of sour cream to each potato. 
  16. Season with freshly ground pepper.
  17. Serve and enjoy!
*Potatoes are one of the worst vegetables for being contaminated with pesticides if they are not grown organically. So it's worth it to buy organic potatoes!


Links to Amazon are affiliate links. If you use these links, your price remains the same, but I earn a small commission. Thanks for supporting this site!

Friday, October 6, 2017

Hash Brown and Beef Hot Dish (gluten-free)

Tater Tot Hot Dish is a popular food in the Great Lakes region of the USA. Ground beef, veggies, gravy, and cheese, topped with crispy potatoes: what's not to like? Most hot dish recipes rely on processed ingredients such as canned cream of mushroom soup and tater tots, but I've opted to instead make this recipe with real, whole food ingredients. The result is a delicious meal that my whole family loves.

When I first made this recipe, I used storebought tater tots, but was dissatisfied with the ingredients therein (especially the unhealthy canola oil). Since my family ended up loving this dish, I developed a way to make it without using tater tots, by substituting hash brown potatoes instead. The resulting Hash Brown and Beef Hot Dish is now a family favorite recipe.

This recipe is one of the regional recipes featured in my All Around the USA Unit Study.

Hash Brown and Beef Hot Dish

Serves 8-10
·         Hash brown topping*:
o   1 stick butter, preferably nutrient-dense butter
o   Two 1-pound bags of southern-style hash browns (organic hash browns have only one ingredient: potatoes)
·         Filling:
o   2 Tb butter, preferably nutrient-dense butter
o   1 large white or yellow onion, chopped
o   8 ounces brown mushrooms, sliced
o   3 large carrots, chopped
o   1&1/2 pounds ground beef, preferably grassfed
o   1&1/2 tsp celtic sea salt
o   1/2 tsp pepper
o   1&1/2 cups frozen green beans
o   3 cloves garlic, minced
o   1/3 cup white rice flour
o   1&1/4 cups chicken bone broth, preferably homemade
o   1&1/2 cups whole milk
o   leaves from 3 sprigs of fresh thyme
o   1 tsp blackstrap molasses
o   1/8 tsp hot sauce
o   1/2 tsp gluten-free soy sauce
o   1 tsp apple cider vinegar
o   1/8 tsp dried allspice
o   1 cup frozen peas (optional)
o   8 ounces cheddar cheese, shredded

Make the Hash Brown Topping:
  1. Melt one stick of butter in a very large, heavy bottomed skillet over medium-high heat. 
  2. Add the frozen hash browns and sprinkle with 1 tsp salt.
  3. Let the hash browns cook for 7-10 minutes, until they are starting to crisp up. Then flip/stir the hash browns. A bamboo spatula works well for this. To make the hash browns crispy, make sure you do not stir them much. 
  4. Continue to stir them only occasionally, until they are well-crisped on all sides.
  5. Turn off heat and set aside.
Make the Beef and Vegetable Filling:
  1. Melt 2 Tb of butter in a large, heavy bottomed skillet over medium-high heat. Add the onion, sprinkle with a pinch of salt, and saute for about 10 minutes. It is fine if the onion starts to get some brown, caramelized color, but adjust the heat as necessary if the skillet is getting too hot.
  2. In the meantime, prepare the carrots and mushrooms.
  3. Add the mushrooms and carrots to the onions. Crumble the ground beef into the skillet and sprinkle with 1&1/2 Tb of salt and 1/2 tsp pepper. (Use less salt if your chicken broth is salted. My homemade chicken broth is unsalted.) Cook for about 7 minutes, stirring every few minutes to ensure that the ground beef and veggies are cooking evenly.
  4. In the meantime, mince the garlic. 
  5. Combine the molasses, thyme leaves, soy sauce, hot sauce, apple cider vinegar, and allspice in a medium bowl. Stir to combine. Add the broth and milk, and stir it all together.
  6. Sprinkle the garlic and rice flour into the beef and vegetable mixture. Stir and cook for about 2 minutes, just until the garlic is fragrant.
  7. Stir the frozen green beans into the beef and vegetable mixture. Then pour in the seasoned broth and milk mixture. Stir well to make sure everything is well-combined.
  8. Bring the beef and vegetable mixture to a simmer and cook, stirring occasionally, for about 5-7 minutes, until the sauce has thickened up nicely. Taste the mixture and adjust the salt and pepper if necessary.
  9. In the meantime, shred the cheddar cheese and preheat the oven to 350 degrees.
Assemble the Hash Brown Hot Dish:
  1. Pour the beef and vegetable mixture into a 9X13 glass baking dish.
  2. Sprinkle the optional peas on top.
  3. Sprinkle the shredded cheese over the meat and vegetables.
  4. Spread the crispy hash browns over the top of it all.
  5. Bake at 350 degrees for 30-35 minutes, until everything is bubbling and hot.
  6. Remove from the oven, serve, and enjoy! Leftovers freeze well for easy future meals.

*Feel free to substitute storebought Tater Tots for the Hash Brown Topping, if desired. If so, skip the steps for preparing the hash brown topping, and just top the filling with the tater tots before baking.


Links to Amazon are affiliate links. If you use these links, your price remains the same, but I earn a small commission. Thanks for supporting this site!

Monday, September 11, 2017

Minestrone Soup (grain-free : nutrient-dense)

Homemade soup is one of my favorite things about the cooler months of the year. Since the heat of summer is finally abating, I'm ready to embrace soup back into our dinner repertoire.  This minestrone soup recipe combines two types of beans with lots of veggies in a flavorful broth. This soup gets a flavor punch thanks to the addition of sun-dried tomatoes, a Parmesan cheese rind, and fresh herbs.

Minestrone Soup

Serves 6-8

  • 3/4 cup of dried kidney beans
  • 3/4 cup of dried white navy beans
  • filtered water
  • dash of baking soda
  • 2 Tb butter, preferably the nutrient-dense yellow type
  • 2 large onions, chopped
  • 3 cups chicken broth, preferably homemade
  • 2 cups filtered water (or substitute with more chicken broth if using storebought broth)
  • 4 tsp Celtic sea salt (use less salt if your tomatoes and/or chicken broth are salted)
  • Parmesan cheese rind
  • 2 bay leaves
  • 1/2 tsp freshly ground pepper
  • 4 carrots, peeled and chopped
  • 4 celery stalks, chopped
  • 3 stalks of chard, stems chopped and kept separate from the greens
  • 4 cloves of garlic, minced
  • one 18-ounce jar of diced tomatoes
  • 3 Tb sundried tomatoes (in olive oil), minced
  • 1 Tb fresh oregano, minced (or substitute 1 tsp dried)
  • 1&1/2 tsp fresh rosemary, minced (or substitute 1/2 tsp dried)
  • 2 Tb fresh basil, minced (or substitute 2 tsp dried)
  • 3 Tb tomato paste
  • 1 medium zucchini or yellow squash, chopped
  • finely shredded Parmesan cheese, to garnish

  1. Cover the beans with plenty of filtered water. The beans will soak up quite a bit of water, so be sure to add plenty. Add a dash of baking soda and allow the beans to soak at room temperature for at least 8 hours or overnight.  This important step reduces the phytic acid antinutrient in the beans.
  2. Drain and rinse the beans. Drain in a colander. 
  3. Chop the onions. Melt the butter in a 4-quart pot. Add the onions and a pinch of salt. Saute for 5 minutes. 
  4. Add the beans to the pot. Cover with 3 cups of chicken broth and 2 cups of filtered water. 
  5. Bring the pot to a boil. Skim off and discard the foam. Add 2 tsp salt, the Parmesan cheese rind, and bay leaves.  Reduce the heat to maintain a simmer. Cover the pot and cook until the beans are soft, about 1.5-2 hours. Stir occasionally.
  6. Meanwhile, chop the carrots and celery. Remove the leaves from the chard and mince the stalks. Reserve the chard leaves for Step 8. Mince the garlic. For the sundried tomatoes, I find it works best to put them in a bowl and then mince with a pair of kitchen shears. Mince the oregano, rosemary, and basil.
  7. Once the beans are cooked, add the carrots, celery, chard stalks, garlic, sundried tomatoes, oregano, rosemary, basil, and tomato paste to the pot. Stir in 2 tsp salt and 1/2 tsp pepper. Cover the pot and simmer for 25 minutes.
  8. Meanwhile, mince the chard leaves and chop the zucchini.
  9. Add the zucchini and chard leaves to the pot. Simmer uncovered for 10 minutes.
  10. Taste the broth and adjust the salt and pepper as desired. Remove the bay leaves.
  11. The Parmesan rind can be removed, or it can be chopped up and consumed with the soup by anyone who loves strong flavors.
  12. Finely shred Parmesan cheese to use as a garnish. A microplane zester works well for this.
  13. Ladle the soup into bowls, sprinkle with Parmesan cheese, and enjoy!
Links to Amazon are affiliate links. If you use these links, your price remains the same, but I earn a small commission. Thanks for supporting this site!

Wednesday, August 23, 2017

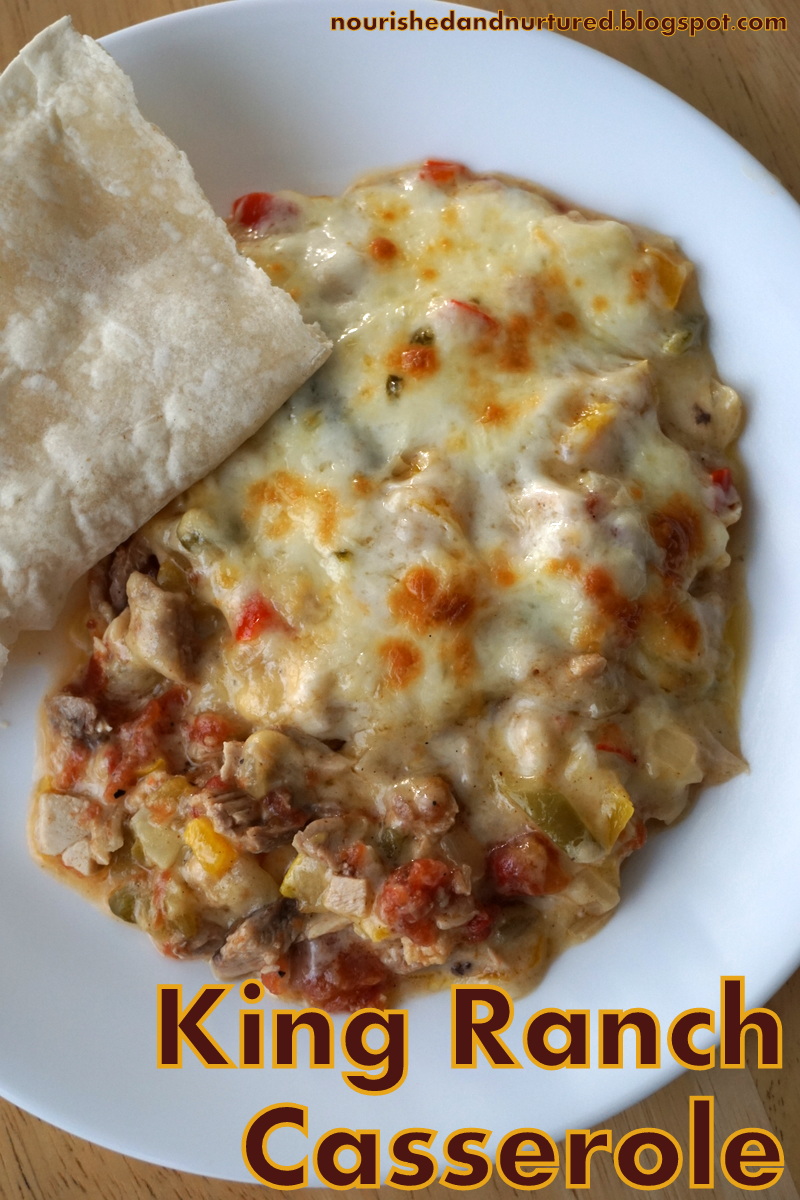
King Ranch Casserole (gluten-free : nutrient-dense)

King Ranch Casserole is a classic Texas dish made with layers of chicken, peppers, and cheese. As with many regional dishes, there is great debate over exactly what makes the quintessential version of this recipe: some call for corn tortillas, others call for flour tortillas, and others have no tortillas at all. I opted to leave the tortillas out and serve the casserole alongside warmed tortillas.  This recipe is featured in my All Around the USA unit study.

King Ranch Casserole

Serves 9-11
  • For the cooked chicken:
    • 6 skin-on, bone-in chicken thighs
    • 1 carrot, peeled and chopped roughly
    • 1 celery stalk, chopped roughly
    • 1 white onion, in large chunks
    • Celtic sea salt
    • filtered water
  • Chicken mixture:
  • Vegetable mixture:
    • 6 Tb butter
    • 2 large yellow or white onions, chopped
    • 3/4 tsp Celtic sea salt
    • 1 large yellow bell pepper, chopped
    • 1 large red bell pepper, chopped
    • 1 small green bell pepper, chopped
    • 4 medium cloves of garlic, minced
    • 3/4 tsp chili powder
    • 6 Tb white rice flour
  • Creamy gravy:
    • 1&1/2 cups chicken broth, preferably homemade
    • 3/4 cup heavy cream
    • 3/4 tsp Celtic sea salt (or less if your broth is salted)
    • 1/4 tsp pepper
  • Cheese:
    • 8 ounces pepper jack cheese, shredded
    • 10 ounces cheddar cheese, shredded
  • Warmed tortillas, for serving
  • Sour cream, for serving
Cook the chicken: 
  1. Place the carrot, celery, and onion in a 4-qt pot. Add the chicken thighs, cover with filtered water, and add a generous pinch of salt. 
  2. Bring the pot of chicken to a low simmer. Cover the pot and allow the chicken to gently simmer for 40 minutes.
  3. Use tongs to remove the chicken from the pot and allow to cool until it can be handled easily. (The super-delicious broth leftover from cooking the chicken can be used for some other meal later on. It makes fantastic nutrient-dense white rice.)
  4. Once the chicken is cool enough, remove and discard the chicken skin. (Or feed it to the dog!) Remove the chicken meat from the bones, being careful to avoid any cartilage or other chewy bits. The bones can be saved for making chicken bone broth
  5. Chop the chicken into small pieces.
  6. The chicken can be prepared earlier in the day or even a day in advance of the meal. 
To make the casserole:
  1. Combine all of the ingredients for the chicken mixture in a bowl and stir to combine. Set aside.
  2. In a very large, heavy-bottomed skillet, melt the butter over medium high heat. Add the onion and 3/4 tsp salt. Sauté for 10 minutes.
  3. Add the chopped bell peppers to the skillet. Sauté for 10 minutes.
  4. In the meantime, whisk together the ingredients for the creamy gravy in a medium bowl. 
  5. Shred the cheese using a box grater.
  6. Add the garlic to the skillet and sauté for about a minute, just until the garlic is fragrant.
  7. Sprinkle the rice flour and chili powder over the vegetables and stir to combine.
  8. Pour the gravy mixture over the vegetables in the skillet. Stir it all together. Simmer for a few minutes until the liquid thickens up. Turn off heat.
  9. In a 9X13 glass baking dish, spread half of the chicken mixture evenly over the bottom of the dish. Top the chicken with half of the vegetable mixture, then sprinkle half of the shredded cheese on top of the vegetable mixture. Make one more chicken layer, one more vegetable layer, and top it all with the remaining cheese.
  10. Bake the casserole in a 350 degree oven for about 25 minutes, until everything is hot and bubbling. If desired, the broiler can be turned on for the last 3-5 minutes to brown the cheese, but watch it carefully as it can burn easily with the broiler on!
  11. Remove from oven and allow to cool for a few minutes.
  12. Serve alongside tortillas, and top with sour cream if desired.

Links to Amazon are affiliate links. If you use these links, your price remains the same, but I earn a small commission. Thanks for supporting this site!

Monday, August 14, 2017

Chocolate Chip Zucchini Muffins (gluten-free : nutrient-dense)

As summer marches on, there is an abundance of local zucchini available. Zucchini's mild neutral flavor makes it work equally well in savory dishes such as ratatouille and spaghetti, as well as in sweet dishes such as muffins and cookies.

I've previously blogged a recipe for grain-free zucchini spice muffins, but this summer I wanted something different. This mildly-sweet chocolate chip zucchini muffin recipe was a hit with all of my family. It makes a tasty, healthy breakfast or snack.

Chocolate  Chip Zucchini Muffins

Makes 12 muffins

  1. Preheat the oven to 350 degrees F.
  2. Line a muffin tin with paper cups. I like to use If You Care Unbleached Baking Cups, as the muffins do not stick to them!
  3. Melt the butter in a small saucepan over low heat. Turn off heat and allow to cool a bit.
  4. In the meantime, combine the rice flour, coconut flour, tapioca starch, salt, baking soda, baking powder, and sucanat in a medium bowl. Whisk it all together to combine, making sure to break up any lumps.
  5. Combine the eggs and sour cream in a large bowl. Beat it all together with a fork or whisk.
  6. Shred the zucchini using a box grater, discarding the ends. The zucchini does NOT need to be peeled before it is shredded.
  7. Mix the zucchini and melted butter into the egg/sour cream mixture with a hand mixer or whisk.
  8. Dump the dry ingredients into the wet ingredients and mix just until combined.
  9. Mix in the chocolate chips.
  10. Scoop the muffin batter into the paper muffin cups. I like the convenience of using a 3-Tb scoop for this, but you could just use a large spoon.
  11. Bake the muffins at 350 degrees F for 25-30 minutes, until the muffins are lightly browned. Another way to tell the muffins are done is to insert a toothpick into the center of a muffin; if the toothpick comes out clean (NOT wet), the muffins are done.
  12. Remove from the oven, cool, and enjoy! 

*Want to know more about why I use white rice flour instead of brown? Check out this article.


Links to Amazon are affiliate links. If you use these links, your price remains the same, but I earn a small commission. Thanks for supporting this site!

Tuesday, July 11, 2017

Crispy, Creamy Coleslaw

Crispy and creamy, cool and refreshing: coleslaw is a versatile side dish that I tend to make more often in the summer months. Besides using coleslaw in its typical pairing with barbecued foods, I like to eat coleslaw in a variety of other ways: as a side dish for breakfast eggs and toast, on sandwiches, on toast with liver pate. This recipe for coleslaw makes an ample portion, so there is plenty to use in the following days. Have you ever tried coleslaw on a sandwich with lunch meat? It's fabulous!

Coleslaw
Makes ~6-7 cups of coleslaw
  1. Remove and discard any bruised or dry outer leaves from the cabbage.
  2. Chop the cabbage in half. Reserve one half for another use.
  3. Remove the core and stem from the cabbage.
  4. Chop the cabbage into small bits. Place in a large bowl.
  5. Peel the carrots. Discard the ends. Grate the carrots and place in the bowl with the cabbage.
  6. Remove and discard the ends from the celery stalk. Chop the celery rather finely and add it to the bowl with the other vegetables.
  7. In a medium bowl, combine the mayonnaise, sour cream, Dijon, sugar, apple cider vinegar, salt and pepper. Stir until well-mixed.
  8. Pour the dressing over the vegetables. Stir it all together.
  9. Cover the bowl and refrigerate for several hours before serving. This coleslaw recipe is even better the next day. 
  10. Serve and enjoy! Besides using this coleslaw as a side dish for meats, try putting it on a sandwich.


Affiliate Disclosure - Links to Amazon are affiliate links. If you use these links, your price remains the same, but I earn a small commission. Thanks for supporting this site!

Thursday, July 6, 2017

Smashed Potato Pancakes (gluten-free : nutrient-dense)

When there are lots of leftover Butter Smash Potatoes, this recipe for Smashed Potato Pancakes is a great way to create something new and delicious. Smashed Potato Pancakes are beautifully browned on the outside, with a nice crispiness that gives way to a soft smashed potato interior. They make a versatile side dish that pairs well with meats, veggies, or applesauce, or they can just be topped with some gravy. Yum!

Smashed Potato Pancakes
Serves 5-7
  • 5 cups leftover Butter Smash Potatoes
  • 2 eggs, lightly beaten, preferably from pastured hens
  • 1/3 cup white rice flour*
  • 1/3 cup packed finely grated Parmesan cheese
  • 1&1/2 Tb minced green onions, green parts only
  • 2-3 Tb refined coconut oil
  • 1-2 Tb butter, preferably from grassfed cows


  1. In a large bowl, mix the rice flour and eggs into the potatoes. Then mix in the Parmesan and green onions. I like to use my Kitchen Aid stand mixer to mix this all together. 
  2. Use a 3 Tb scoop (or just a large spoon) to make mounds of the potato mixture. I like to use a scoop with a spring release mechanism, as it easily makes the mounds all evenly sized and round.
  3. The smashed potato pancakes will need to be cooked in batches. Heat 1 Tb coconut oil and 1/2 Tb butter in a heavy-bottomed skillet over medium heat. (Or, if you want to spend less time cooking the pancakes, use two skillets for this recipe. I like to use two 10-inch cast-iron skillets for this recipe.)
  4. Smash each potato mound between your palms, until they are about 1/3-inch thick.
  5. Once the oil and butter are shimmery and hot, add the smashed potato pancakes, making sure there is plenty of space around each pancake. A 10-inch cast iron skillet will hold about 5-6 of these pancakes at a time.
  6. Cook the pancakes over medium heat for a few minutes, until the edges are looking nicely browned. 
  7. Flip the pancakes over and cook a few more minutes.
  8. Place the cooked pancakes on a paper-towel-lined plate to drain off any excess grease. 
  9. Add more oil and butter to the skillet if necessary before cooking the next batch.
  10. Once the pancakes are all done, serve and enjoy! These taste fabulous plain, dipped in applesauce, or drizzled in gravy
*If you want to know more about why I use white rice instead of brown, check out this article.


Affiliate Disclosure - Links to Amazon are affiliate links. If you use these links, your price remains the same, but I earn a small commission. Thanks for supporting this site!

Thursday, June 22, 2017

Ratatouille (nutrient-dense : dairy-free : grain-free)

Ratatouille (pronounced rat-uh-too-ee) is a perfect summertime side dish. French in origin, ratatouille consists of seasonal vegetables including zucchini, bell peppers, and tomatoes, simmered with olive oil and herbs.  One of my favorite things about ratatouille is that it is just as delicious when served cold as when served warm. I make up a large pot of ratatouille and then eat it as an easy, cool side dish throughout the rest of the week.

Traditionally, ratatouille contains eggplant, but since no one in my family likes eggplant, I make my ratatouille without it.

Ratatouille
Serves 4-6
  • 6 Tb extra-virgin olive oil
  • 2 medium white onions, chopped
  • 1 bay leaf
  • 2 bell peppers, chopped (red, orange, and/or yellow peppers work well in this dish)
  • 1 medium zucchini, chopped 
  • 2 yellow summer squash, chopped
  • 4 cloves garlic, minced
  • 2 tsp celtic sea salt (or less if your tomatoes are salted)
  • 1/2 tsp freshly ground pepper
  • one 18-ounce jar of Jovial diced tomatoes (or substitute fresh tomatoes)
  • 1 Tb fresh oregano, minced (or substitute 1 tsp dried oregano)
  • 2 Tb red wine vinegar (or substitute 1 Tb balsamic vinegar and 1 Tb apple cider vinegar)
  1. Put the olive oil in a 4-quart, heavy bottomed pot. Add the onions, 1 tsp salt, and bay leaf. Cook over medium-high heat for about 10 minutes, stirring occasionally.
  2. Meanwhile, chop the bell peppers, zucchini, and squash. Keep the peppers separated from the squash since they will be added to the pot at different times.
  3. Stir the bell peppers into the pot and cook another 5 minutes.
  4. Meanwhile, mince the garlic.
  5. Add the zucchini and summer squash to the pot, and sprinkle with the other 1 tsp salt and 1/2 tsp pepper. Stir it all together and cook about 3 more minutes.
  6. Meanwhile, mince the oregano.
  7. Stir the garlic into the pot and cook about 2 minutes, just until the garlic is nicely fragrant.
  8. Add the tomatoes, vinegar, and oregano to the pot. Cover the pot and reduce the heat to medium-low, to maintain a simmer. 
  9. Simmer, stirring occasionally for 15-20 minutes. Taste and adjust the salt and pepper if necessary.
  10. Turn off heat and serve! Fried potatoes make a nice pairing with ratatouille. Leftover ratatouille is fantastic when served cold.


Affiliate Disclosure - Links to Amazon are affiliate links. If you use these links, your price remains the same, but I earn a small commission. Thanks for supporting this site!

Friday, June 16, 2017

Hawaiian Chicken Long Rice (grain-free : dairy-free : gluten-free)

Chicken Long Rice is a simple, delicious Hawaiian dish. Chicken thighs are simmered in ginger-and-garlic infused chicken broth, with green onions and bean thread (cellophane) noodles added at the end. My 7-year-old son declared this to be the "best soup he's ever had," and the rest of us really enjoyed it too.

Chicken Long Rice
Recipe adapted from Foodland.com
Serves 5-7
  1. Combine the broth, water, garlic, ginger, salt, and chicken thighs in a heavy-bottomed 4-quart pot.
  2. Bring to a boil and skim off any foam.
  3. Reduce the heat to a low simmer and cover the pot. Allow the chicken to cook for 35-40 minutes, until fully cooked.
  4. Meanwhile, slice the green onions, separating the green parts from the white parts. Slice the white parts about 1/4-inch wide, and the green parts about 1/2-inch wide.
  5. Remove the chicken from the pot and set aside to cool.
  6. Stir the soy sauce, cayenne, and rice vinegar into the broth in the pot. Taste the broth and add more salt as needed.
  7. Add the white parts of the green onions and the noodles to the pot. Allow to simmer for about 10 minutes.
  8. Once the chicken is cool enough to handle, remove the bones and chewy bits. Discard most of the skin (or set it aside for the dog!). Chop the meat into bite-sized pieces.
  9. Add the chicken and onion greens to the pot and bring to a simmer. Cook just long enough to re-warm the chicken. 
  10. Ladle into bowls and enjoy!

Affiliate Disclosure - Links to Amazon are affiliate links. If you use these links, your price remains the same, but I earn a small commission. Thanks for supporting this site!