Sunday, January 29, 2012

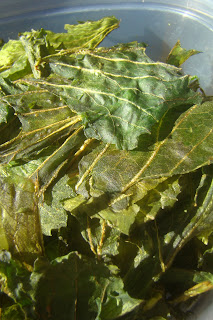
Basic Kale Chips (GAPS-legal, grain-free, paleo/primal)


I just harvested our first bunch of kale from the garden, so we made kale chips this week.  The kids and I love kale chips; they are so crispy and delicious.  They are a little bit time-consuming to make, but a wonderful way to eat your greens!  I like to send the kids outside with their portion because the chips are a bit delicate so they can make lots of little crumbs while they are eating.

Basic Kale Chips
  • One bunch kale
  • 1-2 Tb refined coconut oil, melted and cooled slightly
  • finely ground celtic sea salt
  1. Rip or cut the tough stems off the kale.  Discard the stems or save them for another purpose.
  2. Wash the kale and then dry it well.  I like to use either a salad spinner or a couple towels to dry the kale.  If you do not dry it well, it will steam rather than crisping in the oven.
  3. Rip the kale into chip-sized pieces and place it onto a couple baking sheets in a single layer.  Try not to have much overlap of the pieces of kale, or they won't cook properly into chips.
  4. Drizzle the melted coconut oil onto the kale.  Try to use just enough oil to coat the kale, but not too much or the chips will be overly greasy.  Use your hands to thoroughly mix the oil onto the kale leaves. 
  5. Sprinkle the kale with a generous amount of celtic sea salt.
  6. Bake the kale chips in a 250 degree oven for about 30-45 minutes.  They are done when they are nice and crispy.  They are wonderful straight from the oven.  
This post is part of Frugal Days, Sustainable Ways, Fat Tuesday and Monday Mania!

Thursday, January 26, 2012

Could Ice Cream be a Superfood?

One of the ways I try to promote health in my household is to limit the consumption of desserts, such as ice cream and cookies.  I have read time and again how eating too many sweets can contribute to many health problems.  So for years, I have limited desserts to rare occasions.

But last week I learned something astounding: ice cream is the food that most closely resembles breastmilk Check out the following comparison from 180 Degree Health:
% fat –
Ice cream – 53%
Breast Milk – 55%

% sugar –
Ice Cream – 39.8%
Breast Milk – 38.7%

% Protein
Ice Cream – 7.3%
Breast Milk – 6.3%

% Saturated Fat
Ice cream – 57%
Breast milk – 45%

% Monounsaturated Fat
Ice Cream – 27%
Breast Milk – 38%

% Polyunsaturated Fat
Ice Cream – 3.5%
Breast Milk – 9.7%

% Omega 3 fatty acids
Ice Cream – 1.38%
Breast Milk – 1.19%

% Omega 6 fatty acids
Ice Cream – 2.2%
Breast Milk – 8.5%

Calcium per 100 calories
Ice Cream – 59 mg
Breast Milk – 46 mg

Cholesterol per 100 calories
Ice Cream – 40 mg
Breast Milk – 20 mg
So breastmilk and ice cream are surprisingly similar in their nutrient composition (and this comparison uses a high-fat ice cream, like Haagen Daz)!  Obviously, there are many things in breastmilk that babies need (such as antibodies and probiotics), so ice cream is no substitute for breastmilk for an infant.  But what about kids who have already weaned? 

Give the Kids (and Pregnant Ladies) Some Ice Cream!
The nutritional comparison shows that ice cream could indeed be a superb growth-promoting food. In particular, children, pregnant ladies, and nursing mothers could potentially benefit from eating more ice cream.

I found this comparison shocking, to say the least. It has really gotten my head spinning. One thing is for sure: I'm going to be making lots of ice cream!  There will be more ice cream for every member of our household, from my small-for-age daughter to my low-weight husband to myself who provides milk for an avid-nursing-toddler. This is one change that will be embraced by us all. Mmmm, raw cream, honey, egg yolks, wow!  I'd better get to churning. 

Do you find the nutritional comparison to breastmilk to be surprising?  Will you be allowing more ice cream for your kids?  How about trying some homemade mint ice cream, blackberry ice cream, vanilla chocolate chip ice cream, or strawberry ice cream?

This post is part of Frugal Days, Sustainable Ways, Fat Tuesday, Seasonal Celebration, Monday Mania and Fight Back Friday!

Tuesday, January 24, 2012

Getting Young Kids to Take Cod Liver Oil

UPDATE:You can read about why my family stopped taking fermented cod liver oil here. Now we use Extra Virgin Cod Liver Oil instead, and my kids actually enjoy it!

While I am not big on taking supplements, I try to make sure that everyone in our house has a daily dose of fermented cod liver oil.  This nutritional powerhouse provides Vitamins A and D, plus Omega 3's, DHA, and EPA.  Weston A. Price's studies showed that the diets of traditional people contained ten times the amounts of Vitamin A and D present in modern diets, and this higher nutrient-content led to people with robust health and virtually no cavities, heart disease, or cancer. Cod liver oil is also a great supplement for boosting the immune system.

You Want Me to Eat That?
We never had any problems taking the original Green Pastures cod liver oil.  But once they switched to fermented cod liver oil, things started to get interesting. The flavor of fermented cod liver oil is not the best.  Some bottles I've had have been okay, and some have been downright disgusting (this coming from someone who has been taking cod liver oil daily for over 6 years).  I can make myself grin-and-bear-it, though, especially if I immediately chase it with a sip of water.  But what about the kids?

Tips for Getting Young Kids to Take Cod Liver Oil
I've had to be fairly creative to get my kids to take cod liver oil on a daily basis.  They are both under five years old, and can be pretty stubborn in their refusals if they don't like a certain food (especially my youngest).  I have to remember to be patient and try new methods when they start to fight about taking their cod liver oil. Some methods that work well for us are:
  • Singing: I sing the kids' favorite song of the moment right as I'm bringing the spoon to their mouths.  For the last few months, I've been singing Rudolph the Red-Nose Reindeer, and for many months before that it was My Favorite Things (from the Sound of Music).  I've even made up strange songs, like the Cod Liver Oil Robot song (which I sing in a deep, scratchy voice).  This method has turned something that could be a daily hassle into a daily happy time.
  • Rewards: Sometimes, I have to bribe the kids with a whole foods vitamin bear.  This is usually only necessary for a day or two when they are feeling particularly stubborn. These vitamin pills are treated as treats only, so the kids are always excited to get one. 
  • Variety: In our house, we stock 4 flavors of fermented cod liver oil.  The kids each have their favorite, and it works well to let them choose what flavor they want.   This gives them at least a little control over the whole process.
  • Modeling: I make sure that the kids see me taking my daily dose, and that I smile when I do it!  Hard as it may be sometimes, keeping myself from grimacing is very important to getting the kids to take their dose with no troubles.  For my youngest, watching his big sister take her dose is a sure way to make him excited about having his as well.
  • Chaser: Let the kids choose their favorite drink to chase the dose with.  I like water myself, but my kids prefer raw milk.  This can really help to soften the strong flavor.
  • Persistence: When my son was under a year old, one dose of fermented cod liver oil was enough to turn him off from it for quite a while.  In fact, it made him distrust any food I wanted to give him for a little while.  I refused to give up, and kept trying until he finally started taking it.  Keeping a positive attitude was crucial for this, as was asking his sister to help out by looking happy when she took her dose.  I also had to try a few different flavors to get him to readily accept it. 
What methods do you use to get kids to take their cod liver oil?

This post is part of Monday Mania, Frugal Days, Sustainable Ways and Fat Tuesday!

Sunday, January 22, 2012

What do you want to see on Nourished and Nurtured?

As I come to the end of my GAPS journey, I am wondering what you readers would like to see on Nourished and Nurtured.  I have an exciting series coming up on Homeopathy for Parents, and plenty more grain-free recipes to come.  I'm also working on a grain-free e-cookbook featuring the best grain-free recipes from Nourished and Nurtured. But I am wondering:
  • What do you like the most? Recipes, parenting topics, gardening topics, or all of the above?  
  • Are you here for the grain-free recipes, GAPS-recipes, or just nutrient-dense recipes in general?  
  • Will I lose lots of readers if I start incorporating potatoes and non-gluten grains into some of the recipes I post?
  • Would you be interested in reading book reviews of health, nutrition, and parenting-related books?
  • Do you want more giveaways?
  • Are you interested in recipes for homemade cleaners, detergents, etc?
I want to hear from you!

Wednesday, January 18, 2012

Kombucha Tea and Vinegar (GAPS-legal)


Kombucha tea is a wonderfully refreshing and healthy drink. It is reputed to protect against cancer and gray hair, and it is also a powerful detoxifier.

Homemade kombucha tea is very inexpensive to make. We especially like it with a large squeeze of lemon or lime juice. If you've never drank kombucha tea before, start slowly as the resultant detoxification can cause headaches if you drink too much before your system is used to it.

Making kombucha vinegar is as simple as letting your normal brew ferment for awhile longer. The resultant vinegar can be used in salad dressings, sauces, and any recipes calling for vinegar.  You can also add a splash to bath water for a detox bath.

If you know anyone who brews kombucha, they likely have SCOBYs you can have for free.  If not, SCOBYs can be purchased from Cultures for Health for about $12 or you can grow your own using this method from Food Renegade.

Kombucha Tea and Vinegar
Makes about 3 quarts
  • 4 organic tea bags (black or green tea can be used; we currently prefer 1 black tea bag and 3 green tea bags)**
  • One cup white sugar (this gets consumed during fermentation)
  • 3 quarts (12 cups) of filtered water
  • One cup of kombucha to act as a starter
  • One kombucha SCOBY
  • Equipment needed: one gallon glass bowl or jar, clean white kitchen towel, a large rubberband
  1. Bring 3 quarts of water to a boil. Add sugar, stir, and continue to boil for 5 minutes.
  2. Turn off heat. Add 4 tea bags to hot sugar water.**
  3. Steep for 10 minutes.
  4. Remove tea bags and let tea/sugar mixture cool to room temperature. This will take several hours, or you could put the whole pot over an ice bath. Do not let it cool too long (don’t leave it overnight, for instance, as mold could form.)
  5. When mixture has reached room temperature, pour it into your glass brewing bowl/jar.
  6. Stir in one cup of kombucha starter. Then, with clean hands, add the kombucha SCOBY.
  7. Cover with a clean, white kitchen towel and attach with a large rubber band.
  8. Move the brew to a quiet location with no direct sunlight (we use our home office room; try not to leave it in the kitchen as food particles could get in and ruin your brew).
  9. For kombucha tea, let it ferment for 7-21 days. Don’t move it at all for at least 7 days. You can taste a spoonful to see if it is done when you see a new baby SCOBY on top that is about 1/8” thick. In the winter, it takes 3 weeks for ours to get to our preferred sourness; in the summer it takes 2 weeks. This varies greatly from house-to-house depending on temperature, etc. We also like ours very tart, so it won’t take as long if you like it a bit sweeter.
  10. For kombucha vinegar, let it ferment for at least 4-6 weeks, or even longer.  The longer it ferments, the more vinegar-like the tea will get.
  11. When it is time to bottle the kombucha, pour it into clear glass bottles and store in the refrigerator (we use old bottles from store-bought kombucha). Reserve one cup of the finished kombucha for making your next batch. 
  12. If you want your kombucha to be more fizzy, try bottling it with a tight lid and letting it sit on the counter for a few days.  Beware, though, that it can build up pressure quickly sometimes, so it is recommended to keep it in a cardboard box just in case it pops!  
  13. If you want to have flavored kombucha, follow this recipe.
  14. Store the SCOBY in the 1 cup of finished kombucha. You can leave it at room temperature for a few days, but if it will be longer before you start the next batch you can store it in the fridge. (It is preferred to just start another batch rather than putting it in the fridge.) The SCOBY will get bigger each time you brew, so at some point you will probably want to divide it and either start another batch, give some away, or compost it.
*Kombucha tea is GAPS legal so long as it is fully brewed to be tart.

**If desired, the caffeine content of the final brew can be reduced by doing one of the following:
  • Use only green tea, which contains less caffeine than black tea.
  • Pre-steep the tea bags for 30 seconds in a small pot of boiling water. This removes most of the caffeine content. Then proceed with step 2 by adding the tea bags to the large pot of hot water.
This post is part of Kombucha Challenge Carnival, Fat Tuesday, Monday Mania and Frugal Days, Sustainable Ways!

Sunday, January 15, 2012

Final Results and Stumbling Blocks of GAPS Diet for Mom and Daughter

My family started the GAPS Diet about 17 months ago to address a variety of health concerns.  My daughter and I are now transitioning off the GAPS Diet, but my husband needs to stay on it for a while longer.

Final results of the GAPS diet
Great changes 
  • Goodbye joint pain - I started the GAPS diet primarily to address joint pain problems.  My left shoulder was hurting for nearly a year, making it hard to pick up the baby or even push the kids on the swings.  The GAPS diet has totally cured my joint pain, and I am so happy to be able to go about my life without chronic pain.
  • Improved immune system - My daughter's immune system has improved dramatically while on GAPS.  Previously, she would catch every cold and flu and would be miserably sick with a high fever for 3-4 days even with a cold.  Now, she gets sick less often and, when she does get sick, her symptoms are much less severe. 
  • Better sleep - My daughter was 3 and 1/2 years old when we started the GAPS diet.  For several months prior, she was phasing out her regular afternoon nap, and would only nap perhaps one or two days a week.  After just a few weeks on GAPS, I noticed that she seemed to be napping much more regularly. This pattern has persisted, as even now she rarely misses an afternoon nap (and she is almost 5 years old).  Additionally, before GAPS my daughter used to wake up whimpering or crying most nights, and sometimes several times a night.  She started sleeping much more soundly once we started GAPS, and she rarely makes a peep at night.
  • Less canker sores - The frequency of my canker sores has greatly diminished during the GAPS diet.  Additionally, the sores I do get are not as severe as they once were.
  • My sweating problem - Early on in my adult life, I noticed that I sweat way more than most people.  I was never overly concerned about my sweating while I was still using the typical antiperspirants, but once I started using "natural" alternatives I basically had to give up wearing cotton shirts as I was embarrassed to have large sweat rings under my arms. It never occurred to me that my sweating problem was something that could be cured; I figured it was just part of me.  But I have been absolutely amazed to see that the GAPS diet has remedied the problem! 
  • Clearer skin - Although I've never had much of a problem with acne, I've noticed that on the GAPS diet, I seem to have absolutely NO pimples on my face whatsoever.
  • Improved growth - My daughter has always been very small for her age, beginning with a placenta problem I had while pregnant with her.  Her weight and height gains have greatly improved while on GAPS.
Stumbling Blocks and Remaining Issues
  • Poor energy - My biggest stumbling block on the GAPS diet has been maintaining good energy levels.  I felt absolutely wonderful the first few months, but then started having spells of extreme lethargy and fatigue.  This seems to be related to how many carbs I consume, and I've had to try very hard to make sure to eat more carbs while on GAPS. 
  • Return of adrenal fatigue - I had adrenal fatigue when I started GAPS and was happy to note that it improved greatly in the first few months.  However, in the last few months my adrenal fatigue symptoms have made a comeback.  I think this is also related to consuming too few carbs.
  • Heartburn - I have struggled with heartburn for years.  I had hoped that GAPS would resolve this, but I am still having heartburn fairly frequently.  It does seem to be getting better over time, at least. Fermented foods and apple cider vinegar definitely help, although they are a temporary solution rather than a real cure. I plan to try bitters once I stop nursing my youngest.
  • Probiotic woes - During our time on GAPS, I learned that taking probiotic capsules causes chronic constipation for both my daughter and myself, no matter how slowly we increase the dosage.  (This has not been the case for my husband.)  It works better for me and my daughter to consume more fermented foods rather than taking probiotic caps.  
Was it worth it?
The GAPS diet is very restrictive, and especially challenging in social situations.  But, being on the GAPS diet gave me the opportunity to expand my cooking repertoire to include delicious, grain-free foods and has been a great way to learn how to incorporate more vegetables into our diets.  It has also been a great experience for learning to listen to my body and pay more attention to the cues and signals it gives me.  Overall, the GAPS diet has been well worth the time and effort!

Have you tried a healing diet such as GAPS?  What were the results?

February 2012 UPDATE: we are about 95% back on GAPS for now after seeing a negative impact on my daughter's behavior and a recurrence of some minor joint pain for me. 

This post is part of Frugal Days, Sustainable Ways, Fat Tuesday and Monday Mania!

Wednesday, January 11, 2012

Cranberry Orange Muffins (GAPS-legal : grain-free : gluten-free : primal : paleo)

Cranberries and orange pair wonderfully together.  They make a nice change from the usual sweet muffins, as the cranberries give a nice tart twist.  I hope you enjoy these muffins as much as my family does!

Cranberry Orange Muffins
Makes 12 muffins
  1. Melt butter or coconut oil in a small saucepan over low heat. Turn off heat and allow to cool slightly.
  2. Meanwhile, combine the eggs, salt, vanilla extract, and orange extract in a large bowl.  If using an immersion blender, pulse a few times to combine. Otherwise, mix to combine with a whisk or mixer.
  3. Add the honey to the butter (or coconut oil) and stir slightly.  Pour this mixture into the wet ingredients and blend well with immersion blender or mixer.
  4. Measure out the coconut flour.  Since coconut flour clumps, it will need to be sifted if you are not using an immersion blender
  5. Pour the coconut flour and orange zest into the bowl with the wet ingredients.  Use an immersion blender or mixer to thoroughly combine all ingredients, making sure there are no lumps.  (Since coconut flour does not contain gluten, there is no worry of over-mixing it).
  6. Fold in the cranberries with a spoon or spatula.
  7. Line a muffin tin with paper cups.  Scoop the muffin batter into the paper cups.  I like to use a 3-Tb scoop for this, but you could just use a large spoon.
  8. Bake muffins in 325 degree oven for about 40-50 minutes, until muffins are set and a toothpick inserted in the middle comes out clean.  If you are in a time-crunch, you could bake them at 350 degrees initially, but you'll need to reduce the heat after a bit so they won't burn before being set in the middle.
  9. Remove from oven and cool.  
Delicious with a pat of butter and a big glass of raw milk or milk kefir!

*Time-saving tip: If you use an immersion blender to combine the ingredients, you can skip the step of sifting the coconut flour.  This also gives you less dirty dishes!

This post is part of Fat Tuesday, Monday Mania and Frugal Days, Sustainable Ways!

Saturday, January 7, 2012

Troubleshooting Energy Problems While On GAPS Diet

The first few months I was on the GAPS diet, I felt like I was on cloud-nine.  I felt amazing, and was so happy to be free from the joint pain that had plagued me for nearly a year.  After about 5 months on the diet, I started to notice some energy problems.  Specifically, I started having spells of extreme lethargy and fatigue.  Like, "I need to go lay on the floor for awhile" and "I can't keep my eyes open".  After a bit of experimenting, I figured out that this problem was caused by eating too few carbohydrates.

Is the GAPS Diet Low-Carb?
The GAPS diet is not necessarily a low-carb diet.  Fruits, veggies, lentils, white beans, and honey are all allowed on the diet.  But, I've tended to shy away from things like lentils and white beans while on  GAPS because they can cause digestive upset for some of the other members of my family.  I also tend to not each much fruit, as I don't really crave sweet things like I used to years ago.  So for me, the GAPS diet can easily be very low carb.

Who Needs Carbs?
Other popular low-carb diets, such as Primal and Atkins, are quick to point out that people do not need carbs, since the body can manufacture them from other energy sources.  However, it became clear to me that I do need plenty of carbs to have normal energy levels.

My daughter and husband, who are also on the GAPS diet, have not had the same energy complaints.  It seems that perhaps being a woman, or specifically being a breastfeeding mother, can cause me to need more carbs.  Or who knows, maybe it has to do with the foods my ancestors ate for thousands of years.  Whatever the cause, it is clear that I can't follow a low-carb diet without having energy problems.  I do know that there are plenty of other people, women specifically, who have complained of energy problems on GAPS.

Carbs and Adrenal Fatigue
Recently I've noticed that some of my old adrenal fatigue symptoms have been coming back: balding lower legs, vertical lines on the inside of my fingertips, and cold hands.  As I've been researching the cause, I've learned that eating a low-carb diet can tax the adrenal glands!  When the diet is low-carb, the adrenals have to keep sending out hormones to signal the liver to release glucose.  I'm thinking that the return of my adrenal problems signals that I still haven't been eating enough carbs while on GAPS to properly nourish my body.

Steady Energy
To keep the energy levels more steady throughout the day, I'm eating more carbs. I include at least one of the following with each meal:
  • Milk kefir or plain yogurt
  • Winter squash, such as butternut or spaghetti: These seem to be fairly high in carbs compared to other veggies.
  • Lentils
  • White navy beans

Energy Boosts
To deal with any spells of extreme lethargy or fatigue, I find that eating one the the following helps.These give a quick energy boost and chase that lethargic feeling away.
  • Fruit: I generally eat at least 3-4 pieces each day while on GAPS. Apples, pears, bananas, oranges, cherries, and blueberries all seem to work well for a quick energy boost.
  • Macaroons: I keep a stash of frozen macaroons in the freezer.  If I get that awful lethargic feeling, I'll go eat one right away.  
  • A small spoonful of honey
Have you had any energy problems while on GAPS or a low-carb diet?  What has helped?

This post is part of Frugal Days, Sustainable Ways, Fat Tuesday and Monday Mania!

Wednesday, January 4, 2012

Grain-free Cinnamon Raisin Bread (GAPS-legal, primal, gluten-free)

While looking for a little variety in our breakfast options, I was reminiscing about the sprouted cinnamon raisin bread we enjoyed prior to the GAPS Diet.  So I developed this recipe for grain-free cinnamon raisin bread, and it is wonderful!  This is my daughter's new favorite breakfast, and I love that it is less sweet than the muffins I typically make.

My favorite way to serve this is to toast it and spread it with softened butter.  If you want to make toast, use a toaster oven and try to keep the bread from being directly over the heating element.  I'm not sure whether this bread would stand up to a regular toaster, as it is fairly soft and the coconut flour can burn easily.

Cinnamon Raisin Bread
  • 1/2 cup (1 stick) butter
  • 1/4 cup honey
  • 5 eggs, preferably from pastured hens
  • 1/4 tsp finely ground celtic sea salt
  • 1/4 tsp baking soda
  • 1 tsp vanilla
  • 1/2 tsp ground cinnamon
  • pinch nutmeg
  • 1/3 cup coconut flour (this should be sifted if you are not using an immersion blender)
  • 1/4 cup almond flour, preferably from crispy nuts
  • 1/2 cup raisins
  1. Melt the butter in a small saucepan over low heat.  Turn off heat, add the honey, and give a little stir.
  2. In a medium bowl, combine the eggs, salt, baking soda, vanilla, cinnamon, and nutmeg.  Blend well using an immersion blender or hand mixer.
  3. Add the butter and honey, and blend well.
  4. Add the coconut flour and almond flour.  Blend well with an immersion blender or hand mixer.
  5. Fold in the raisins with a spoon or spatula.
  6. Butter two small loaf pans, or line them with parchment paper.  I used loaf pans that were 7.5X3.75X2.25 inch.  Although the batter would all fit into a larger loaf pan, it will cook better as two smaller loaves so that the coconut flour will not be overcooked before the middle is set.
  7. Pour the batter into the loaf pans.
  8. Bake the loaves at 325 degrees F for about 25-35 minutes, until the middle of each loaf is set and the top has started to turn a nice golden brown color.  I like to cook this bread for a few minutes past when the middle is set so that the bread will be nice and dry for toasting.
  9. Remove from the oven and cool completely before removing from the loaf pans.
  10. Store in the fridge or freezer.  I like to use a good bread knife to cut each loaf into many slices.  I then place a small square of parchment paper between each slice, wrap it all in plastic wrap, and store it in the freezer.  The parchment paper ensures that I can easily pull out just one slice at a time.  This bread freezes very well, and makes great toast!
This post is part of Fat Tuesday, Monday Mania and Frugal Days, Sustainable Ways!